


For iPhone, iPads, and smartphones, you can reissue an eSIM from the device's settings app without having to go through the reissue process.
We will guide you through how to set up an eSIM using eSIM Quick Transfer and Android eSIM Transfer.
0:30 ~ 23:30
Please prepare a Wi-Fi environment before setting up. A Wi-Fi connection is required when downloading the eSIM.
The screens shown are for iOS 17. The screens may differ depending on the iOS version and device status.
Both your old and new iPhone must be updated to iOS 17 iPhone later.
Also, please make sure that you have set a passcode on your iPhone.
Do not reset your iPhone before the eSIM reissue is complete. If you reset it, the eSIM cannot be reissued.
If you want to transfer the eSIM to a new iPhone, please perform the following settings after completing the initial setup of your new iPhone.
Please sign in to the same Apple iPhone iPhone
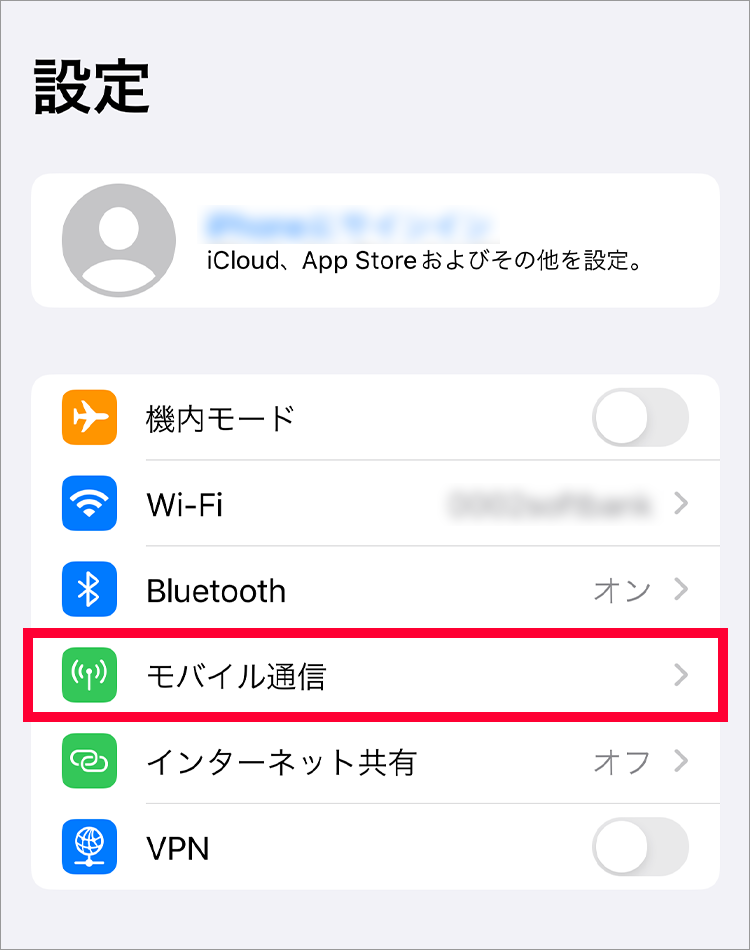
1. Tap "Settings"

2. Tap "Mobile Data"

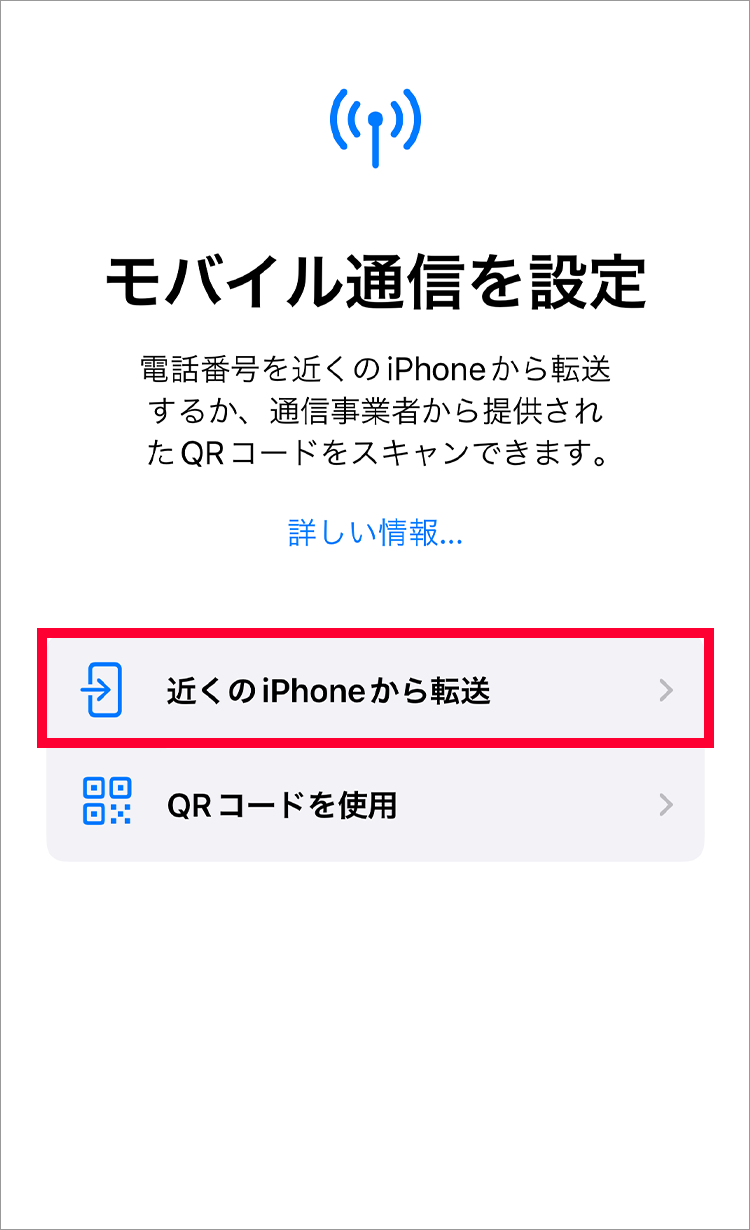
3. Tap "Set up mobile data"

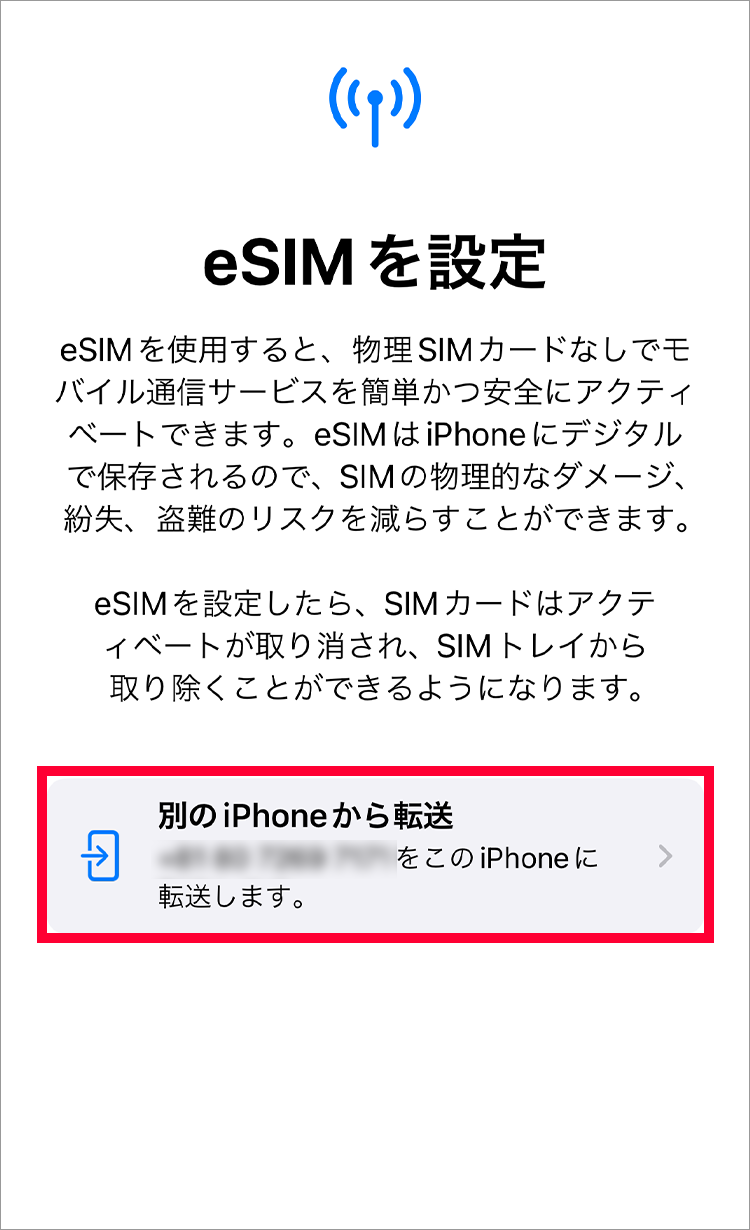
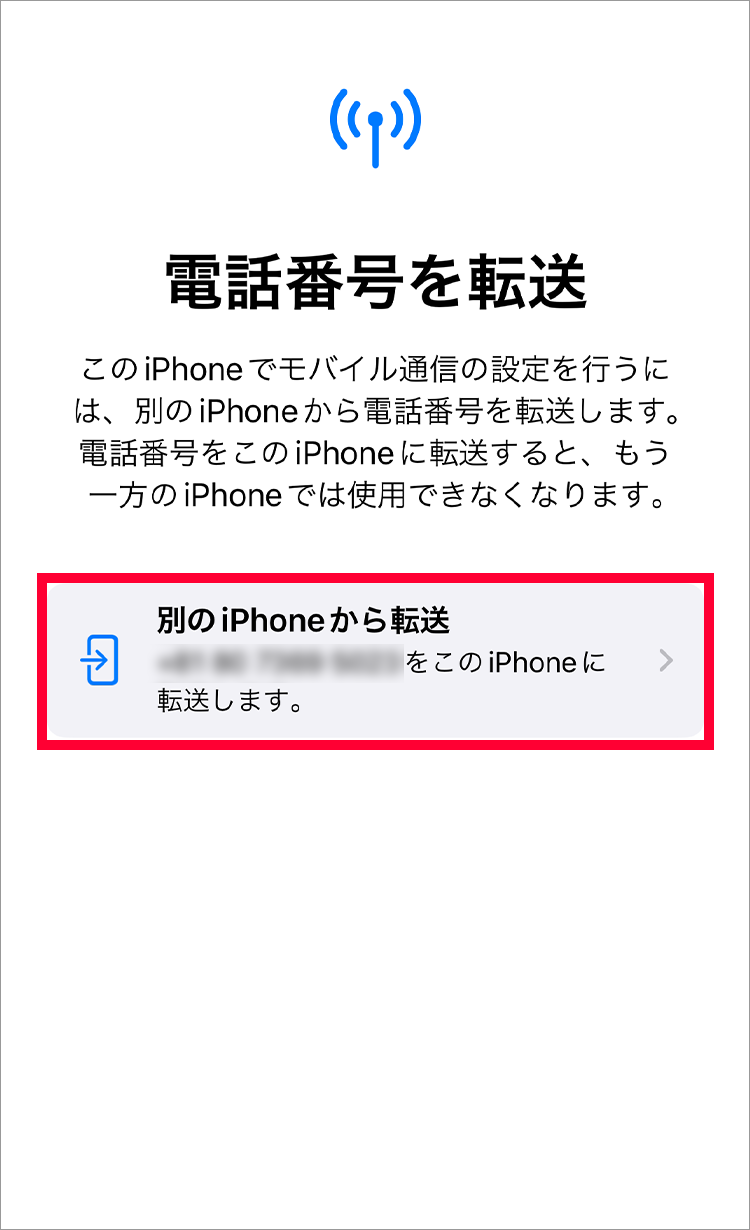
4. Tap "Transfer from another iPhone"
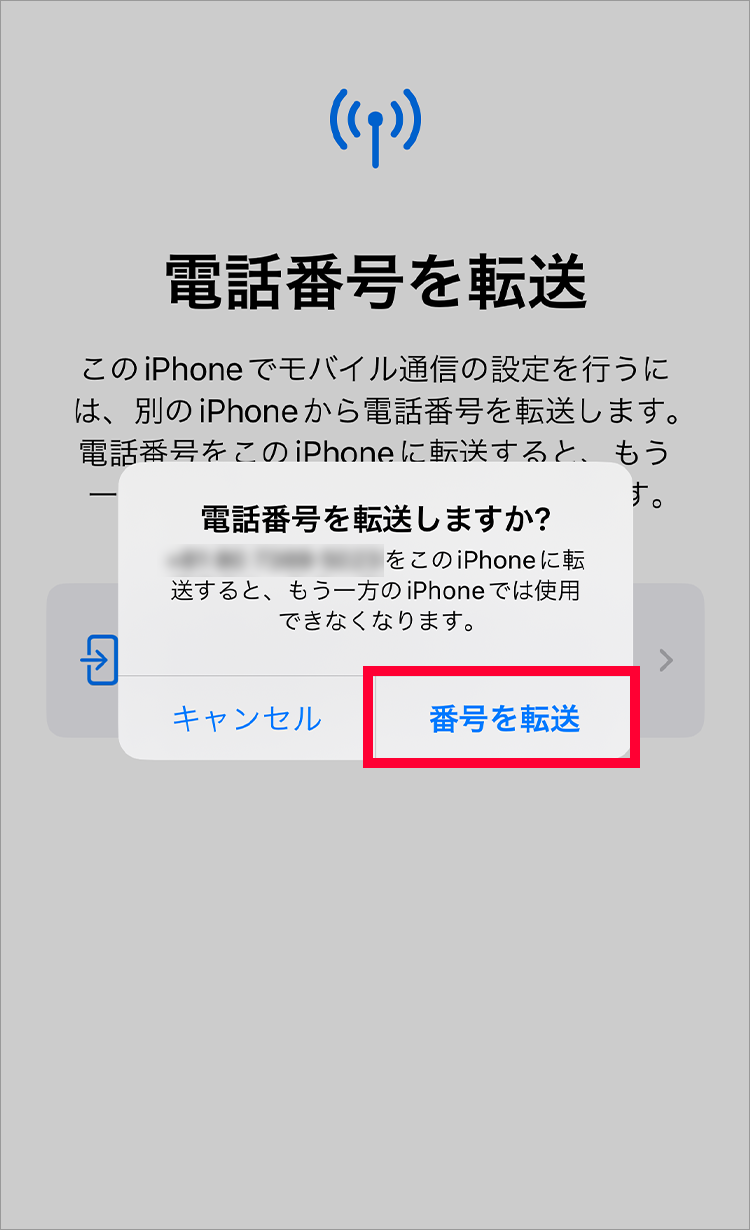
5. Tap "Transfer Number"
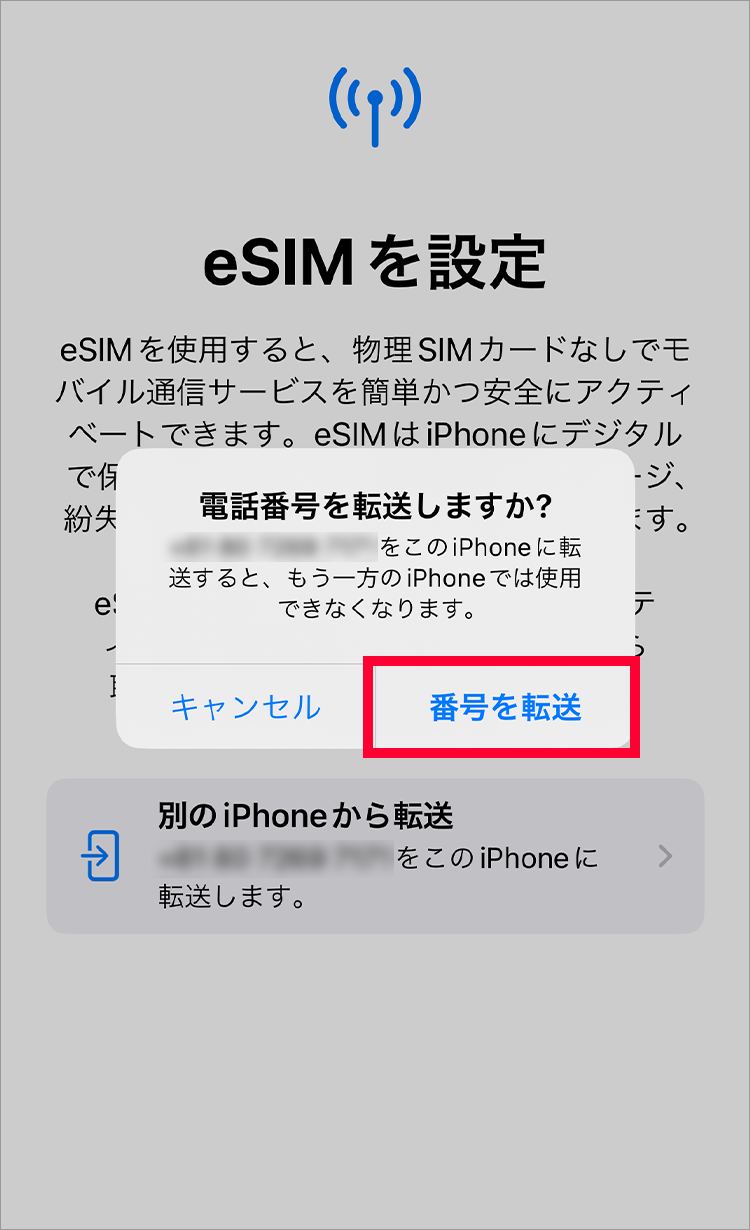
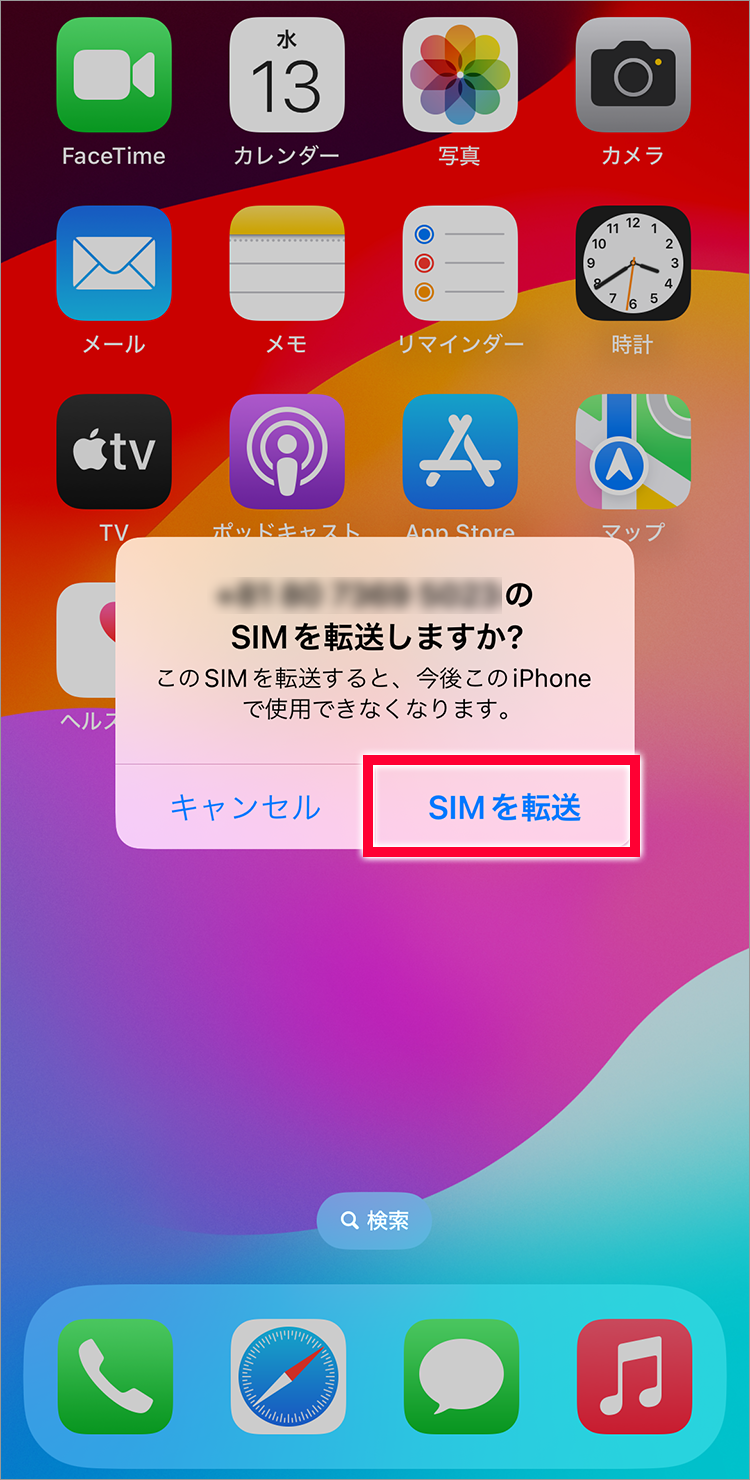
6. Tap "Transfer SIM"
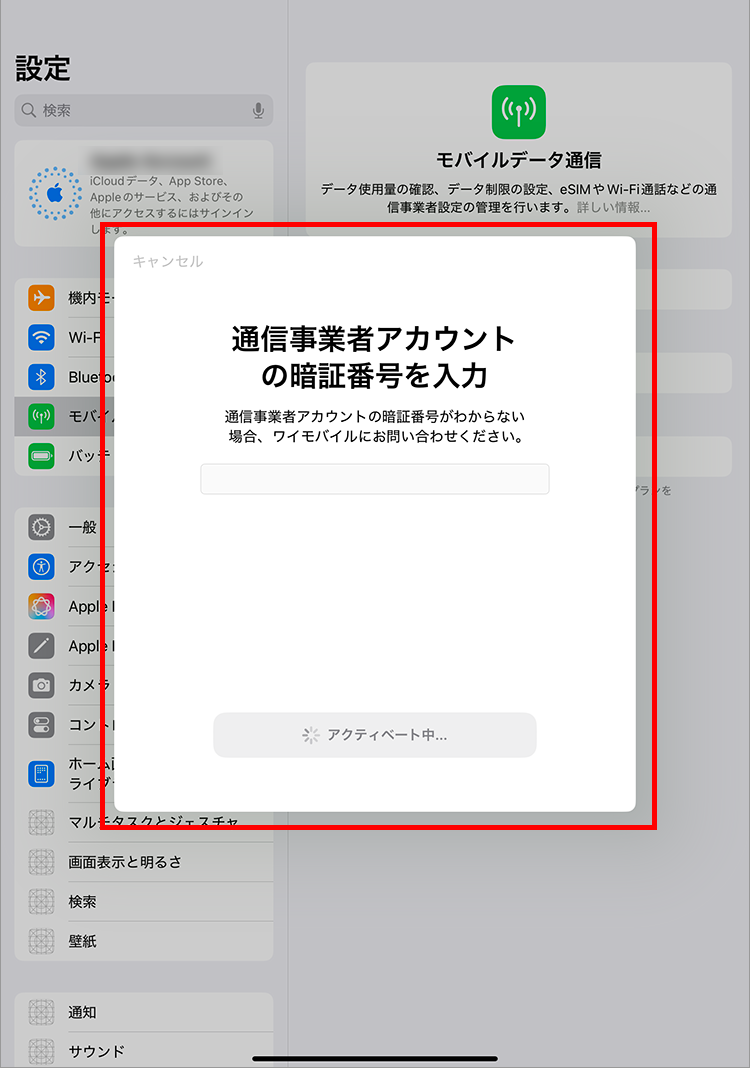
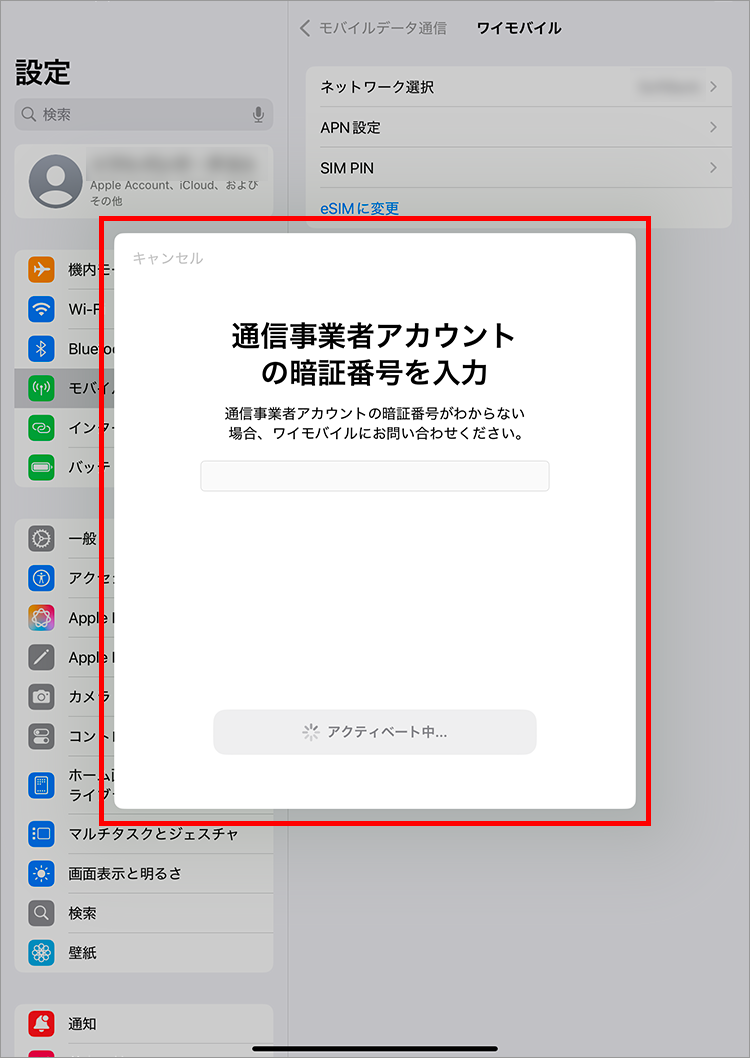
1. Enter the 4-digit PIN you set during the contract and tap "Continue".

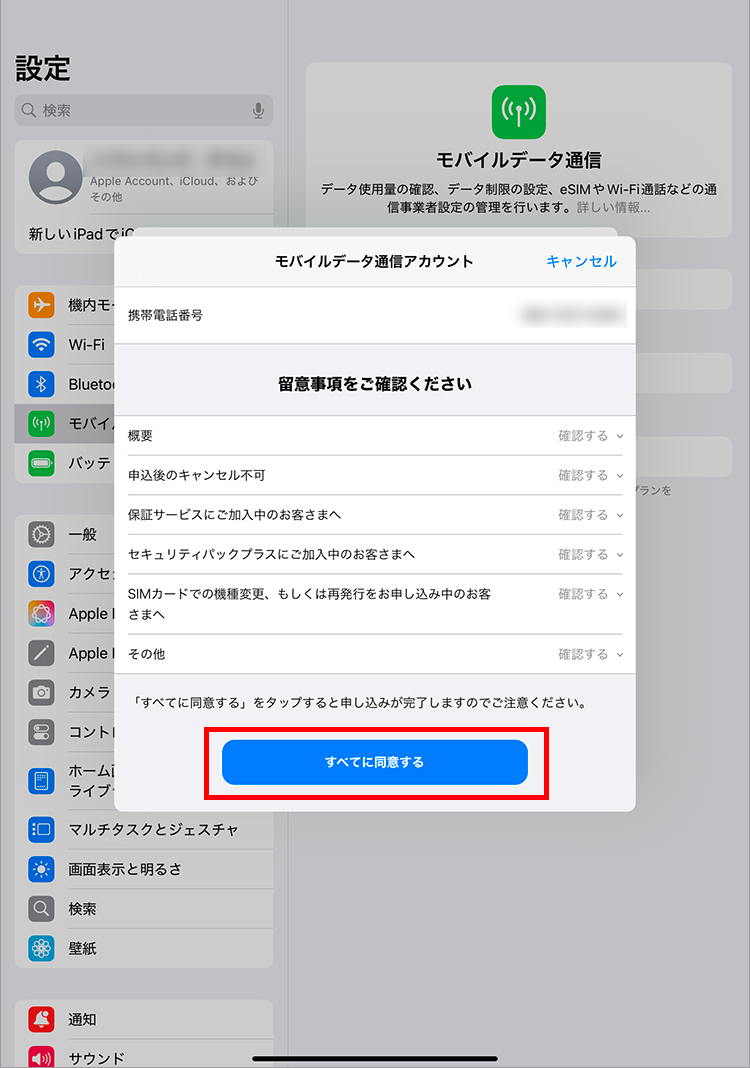
2. Review the important notes and select "I agree".

3. "Activating..." or "Connecting to network..." will be displayed.

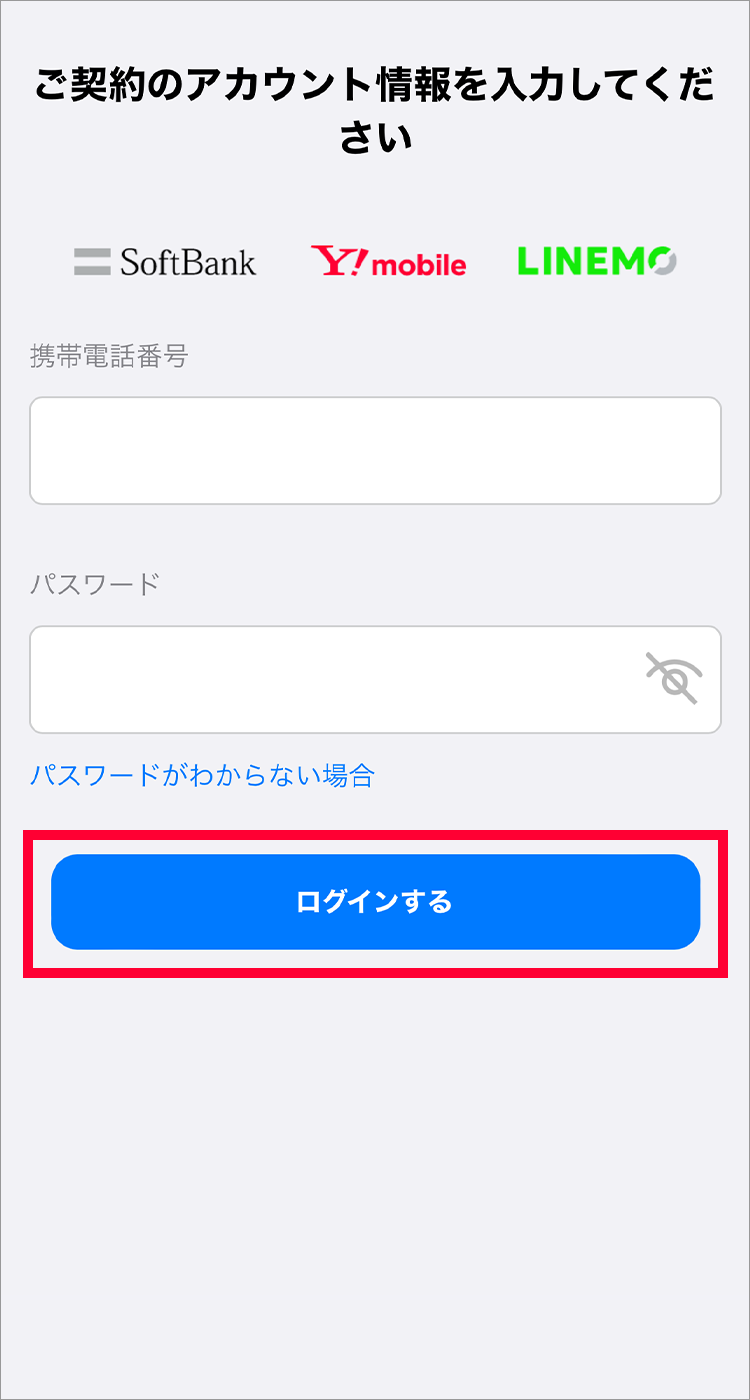
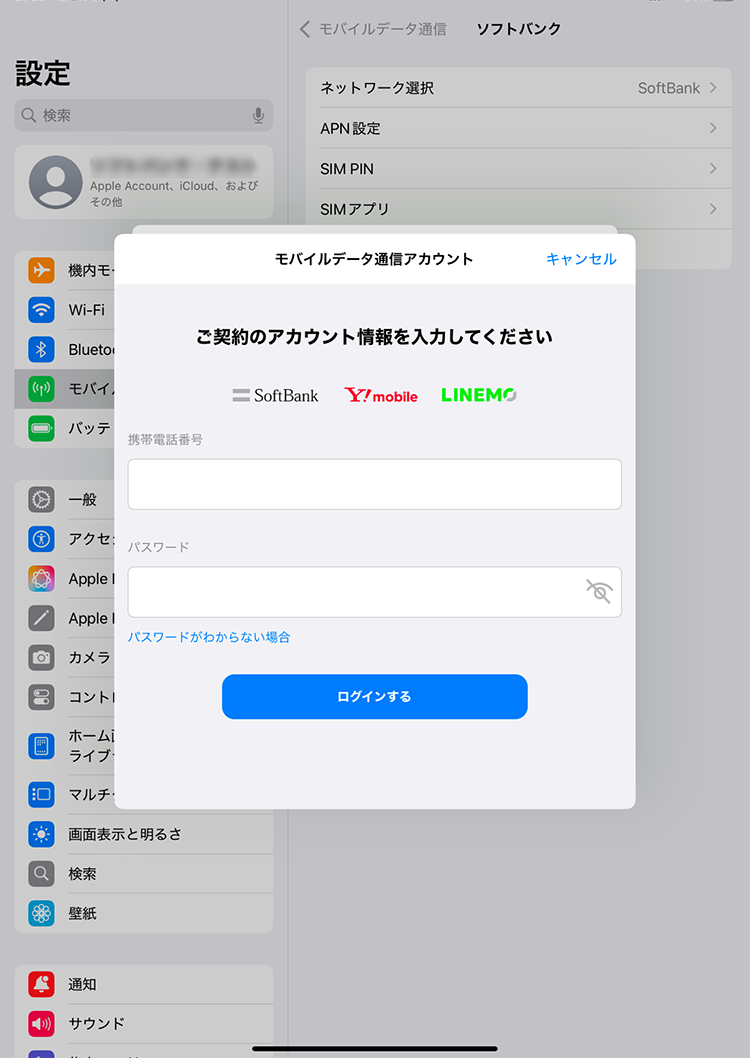
1. Enter your mobile phone number and My Y!mobile password and tap "Log in"
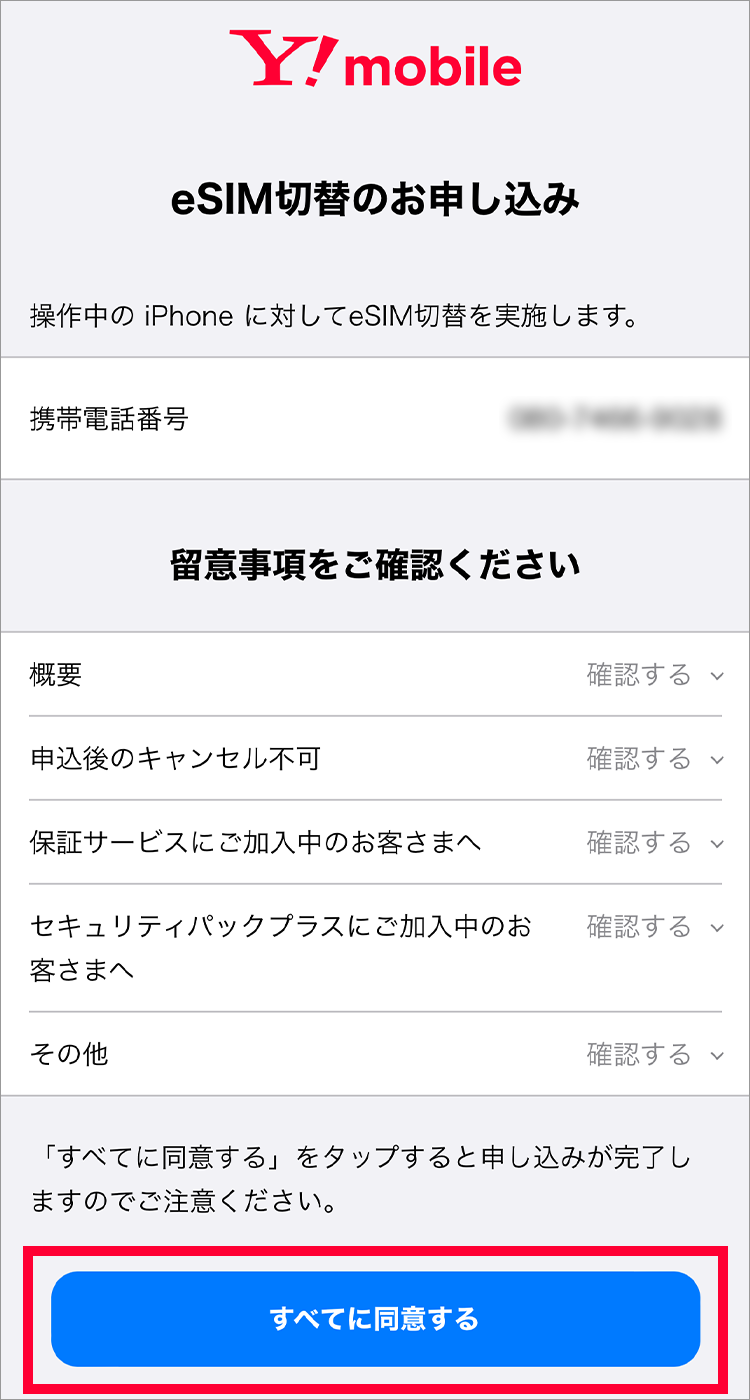
2. After reading the terms and conditions, tap "Agree to all"
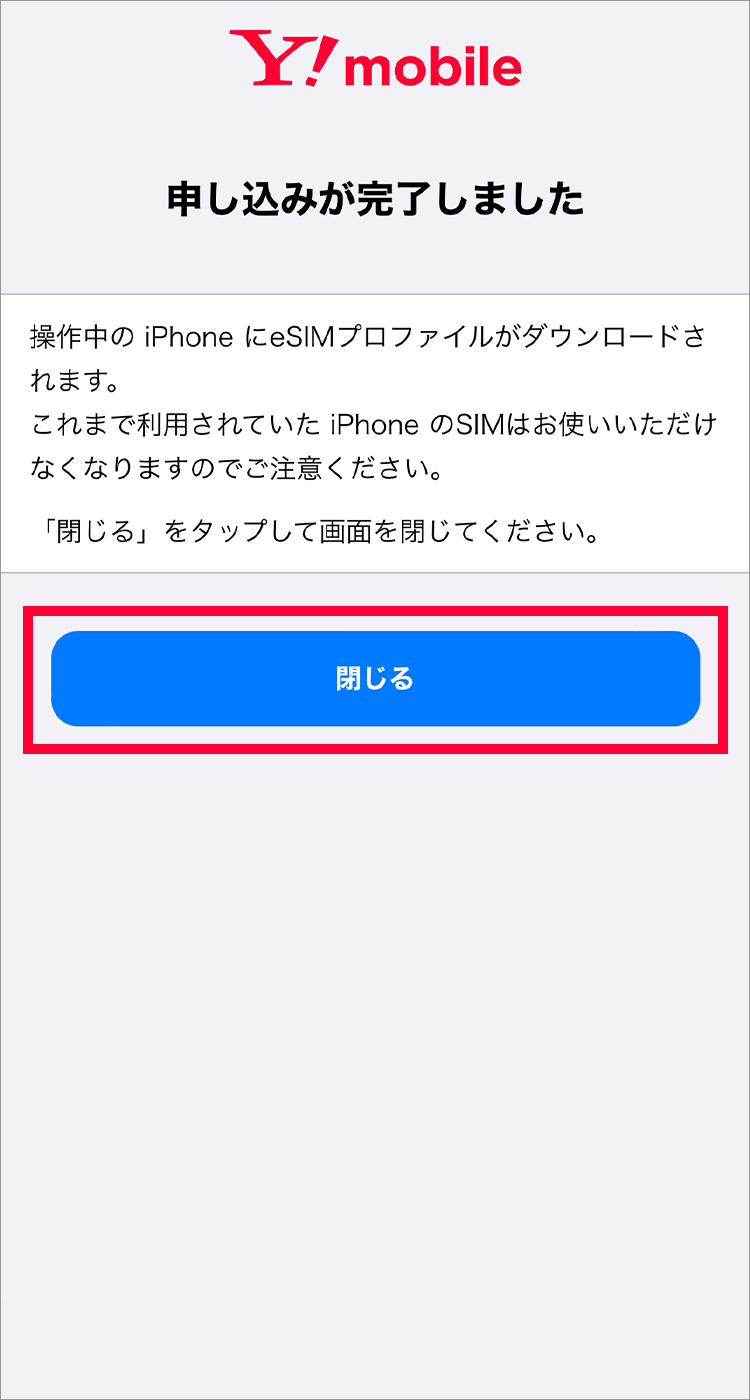
3. Once the application is complete, the following screen will be displayed and you will receive an email confirming that your line has been activated.
4. Tap "Continue"

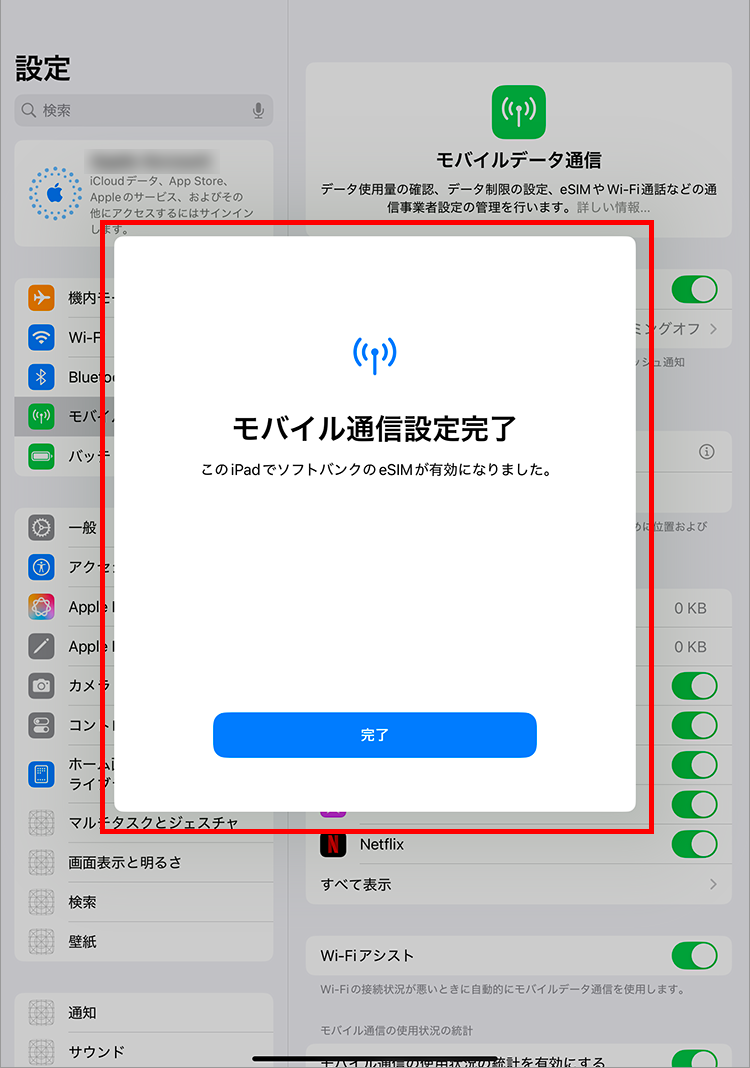
5. When this screen appears, tap "Done" and restart the device.
This completes the setup.
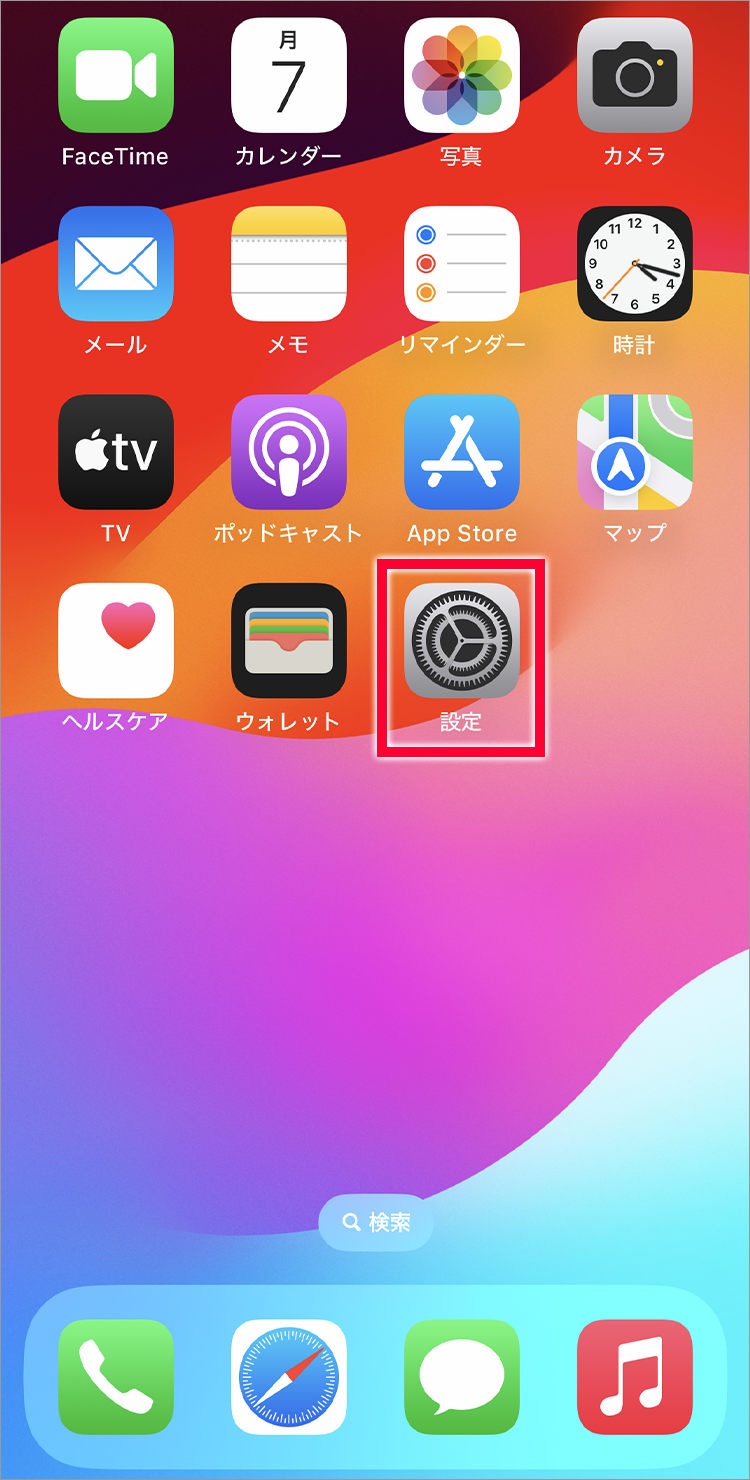
1. Tap "Settings"
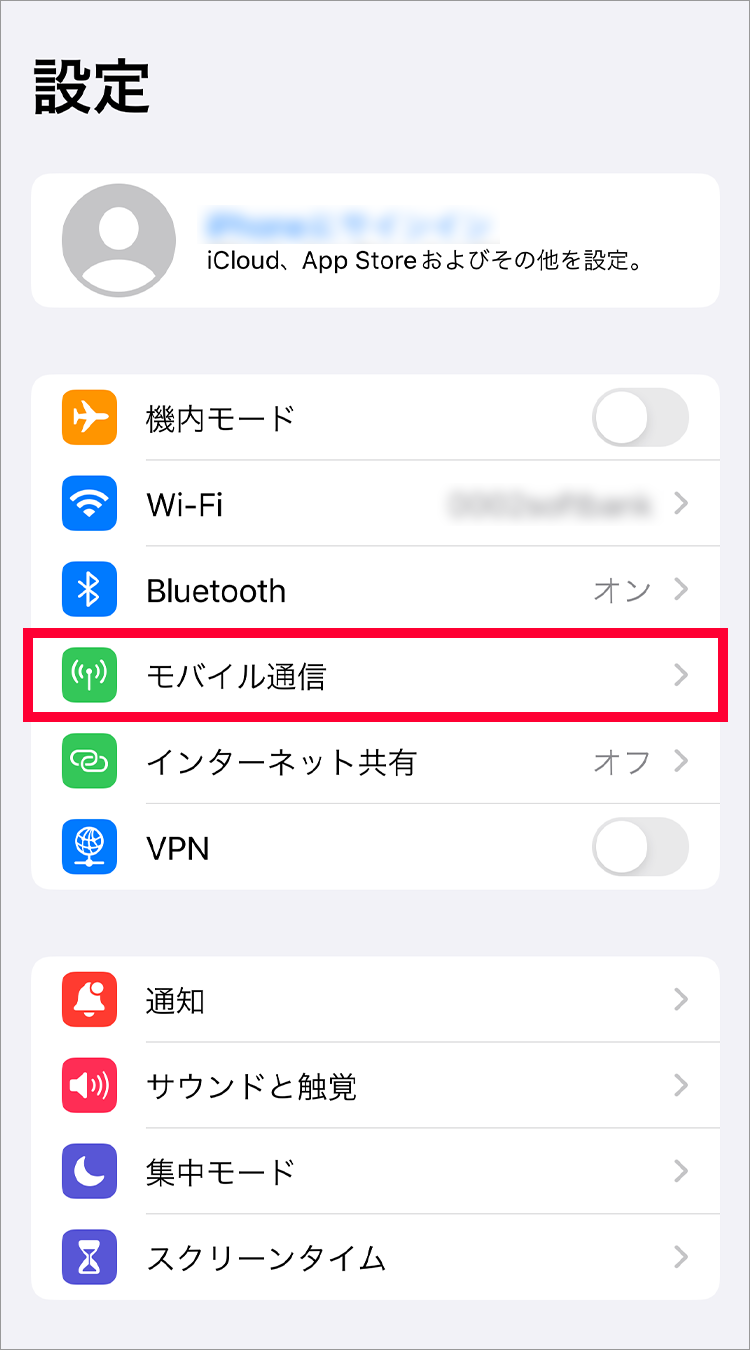
2. Tap "Mobile Data"
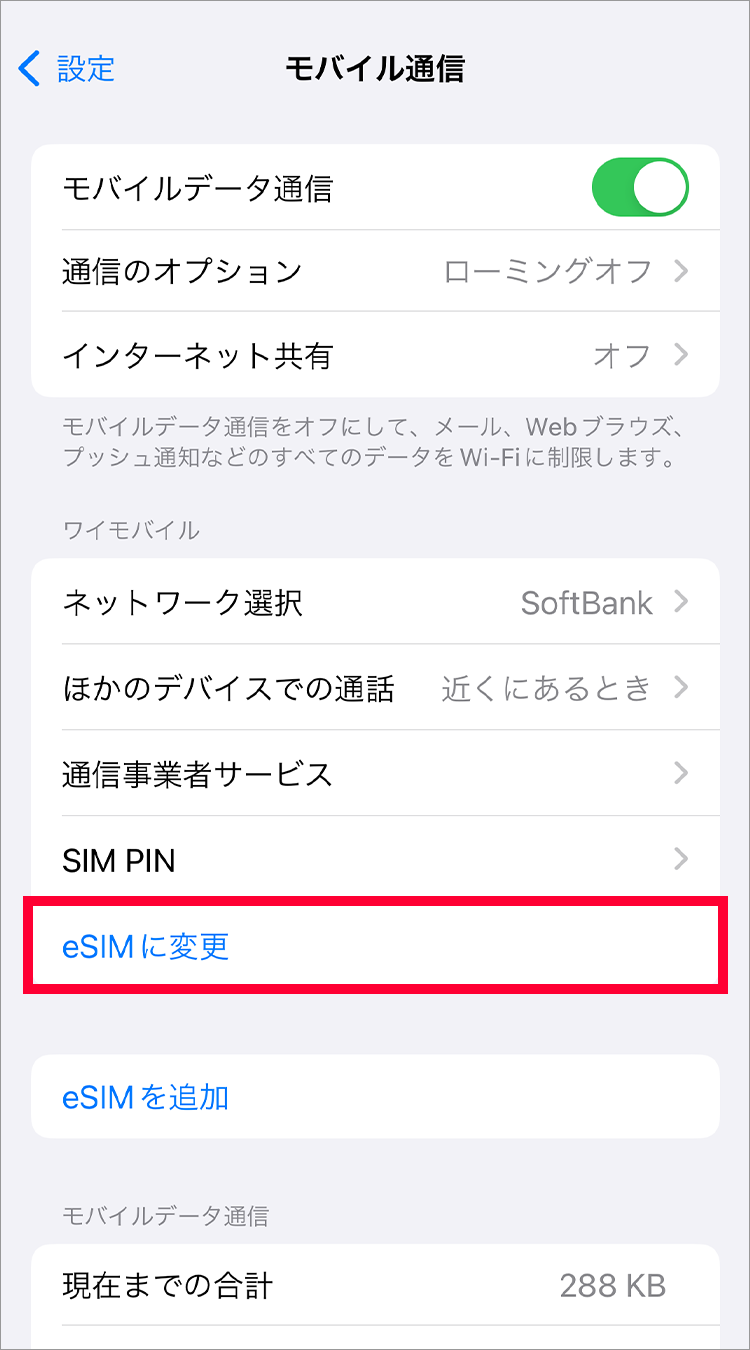
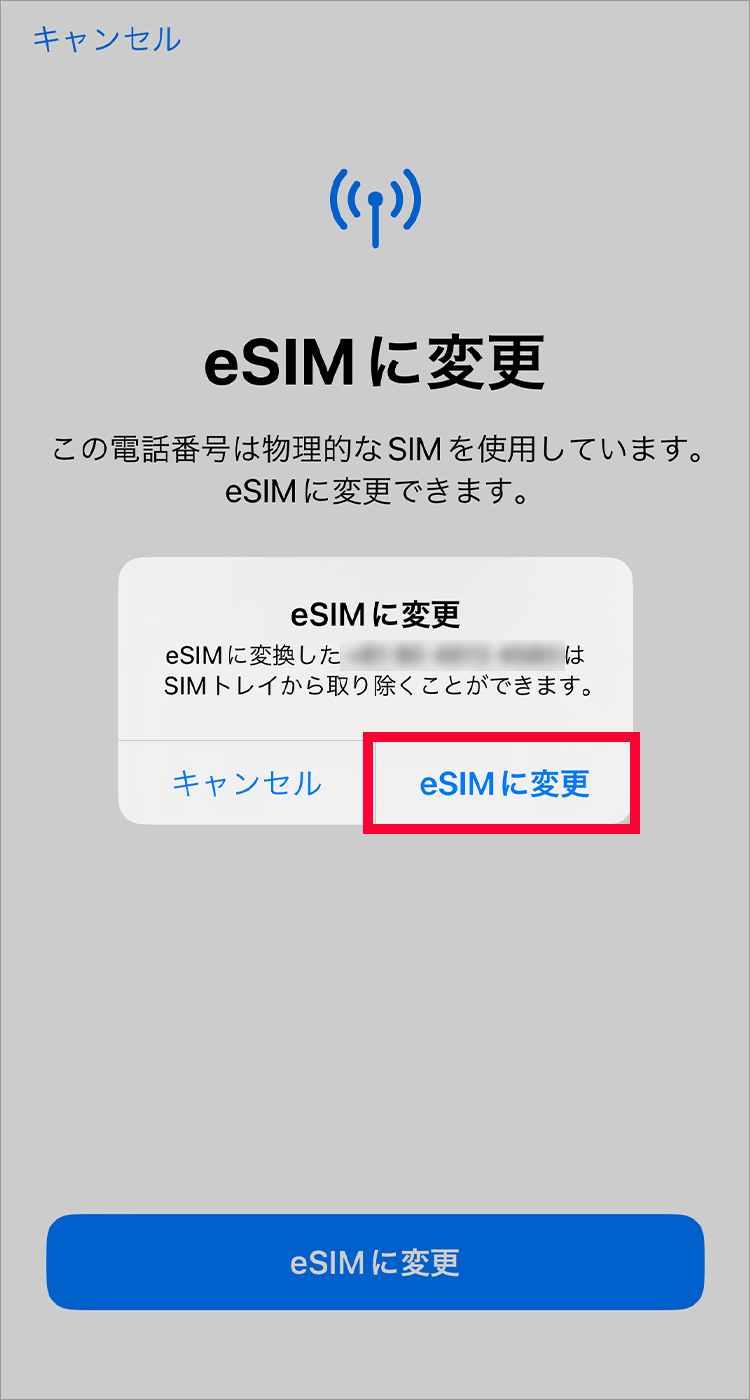
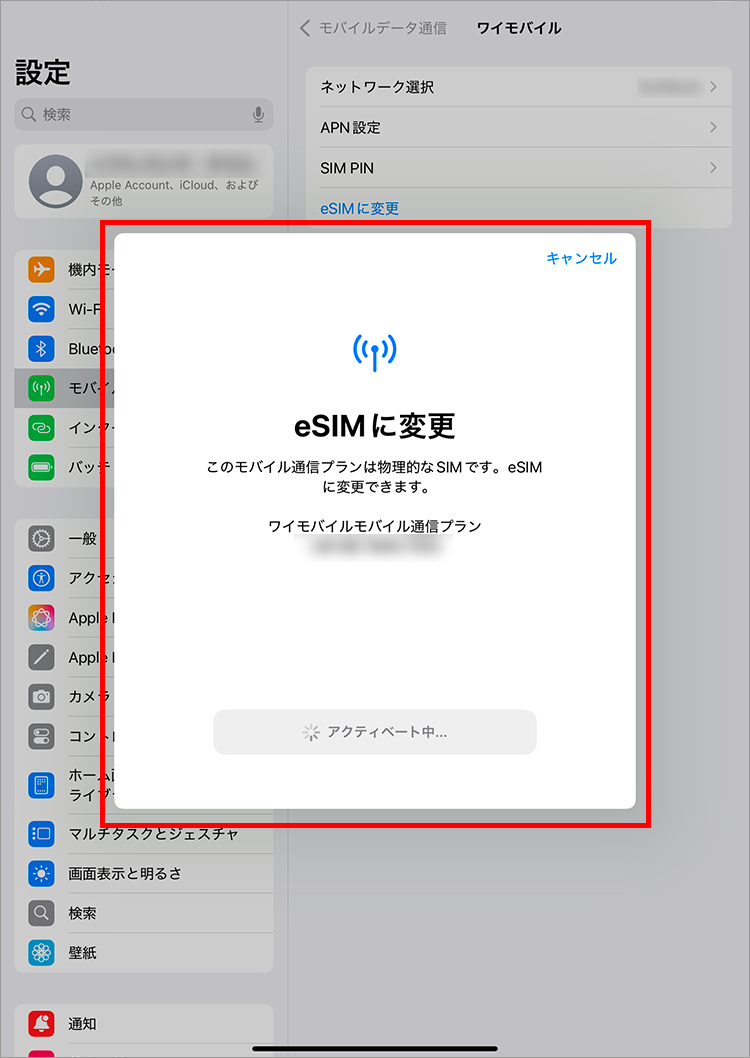
3. Tap "Change to eSIM"
4. Tap "Change to eSIM"

5. Tap "Change to eSIM"
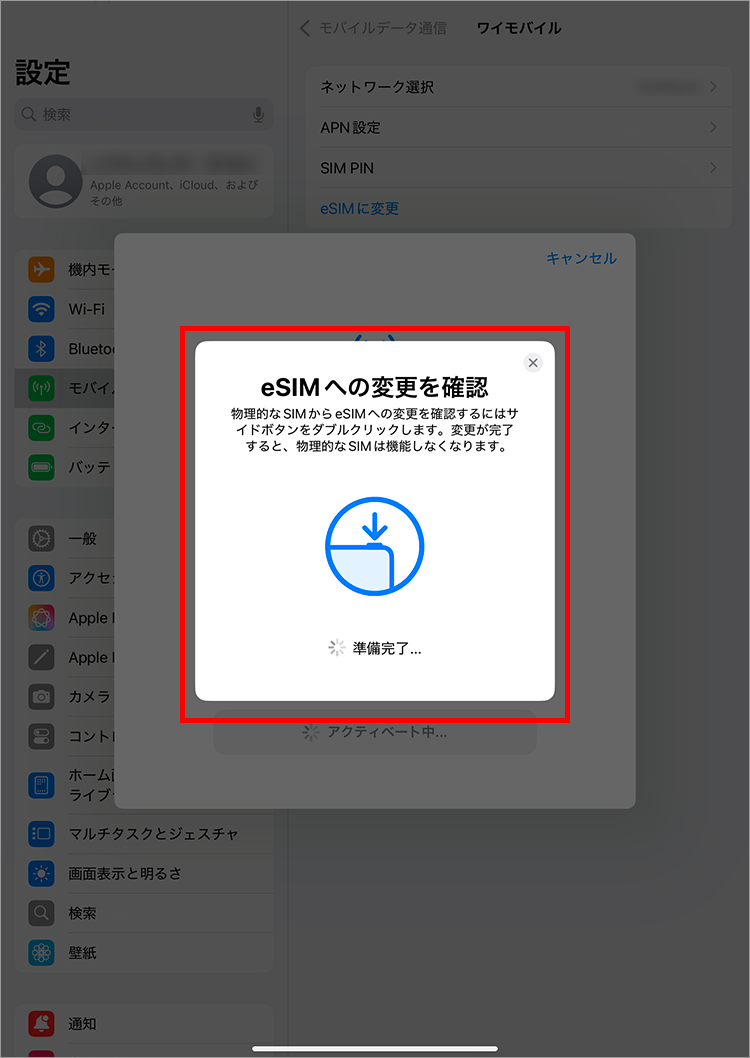
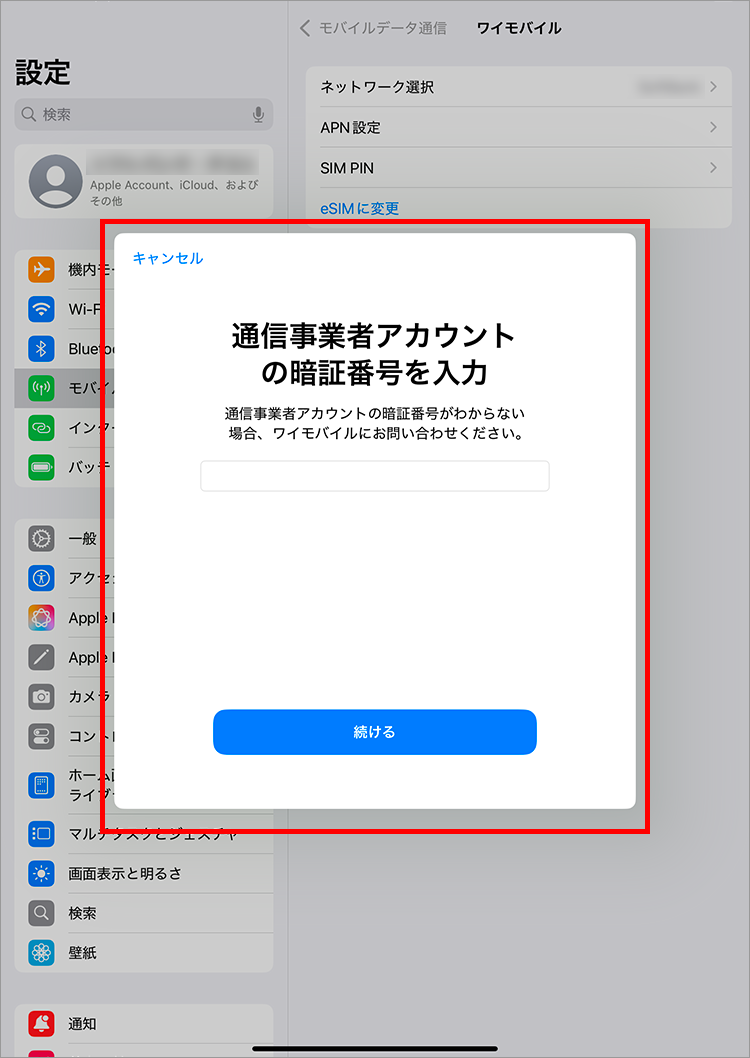
1. Enter the 4-digit PIN you set during the contract and tap "Continue".
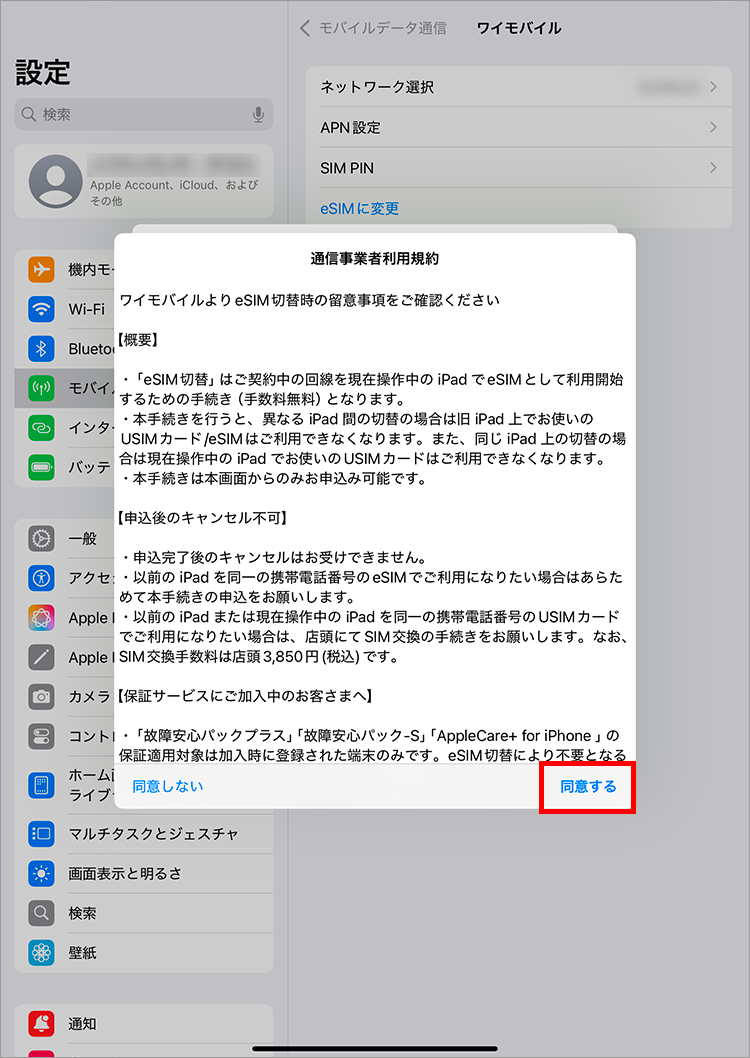
2. Review the important notes and select "I agree".
3. "Activating..." or "Connecting to network..." will be displayed.
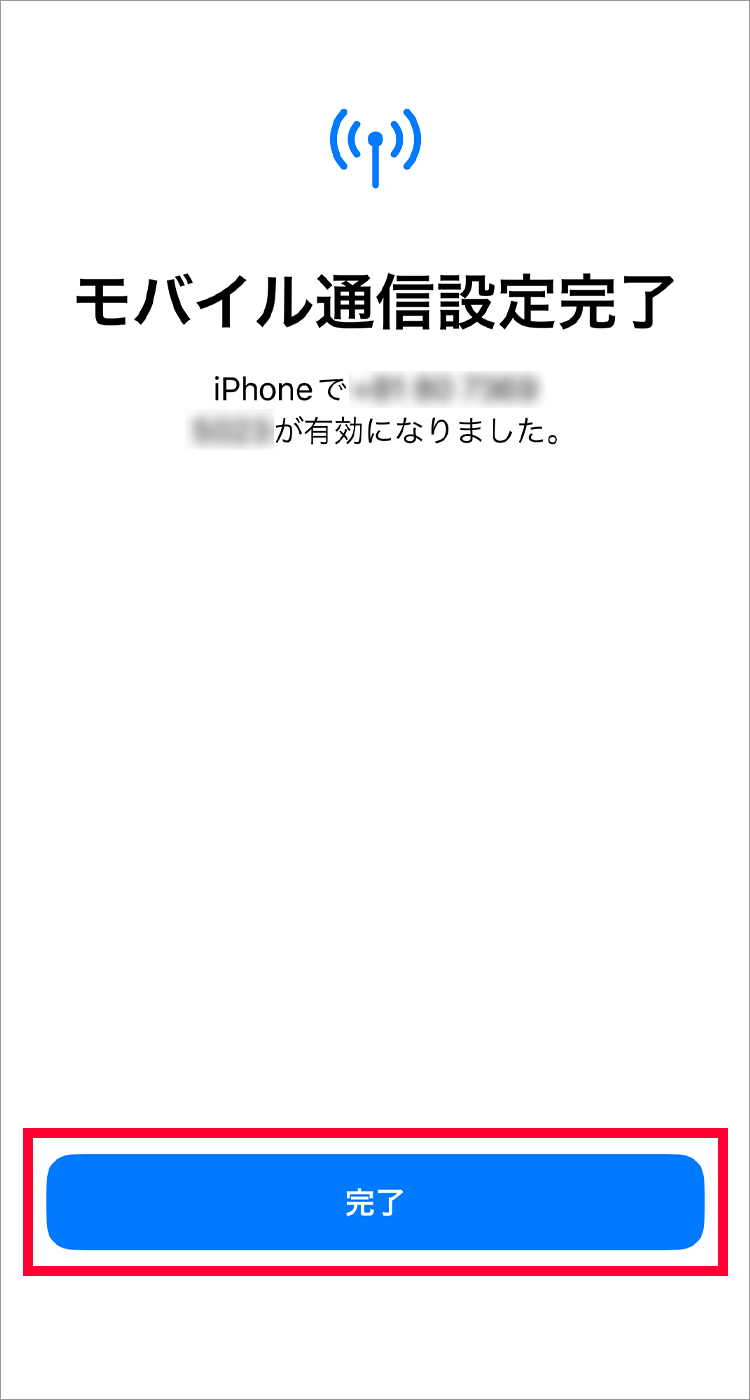
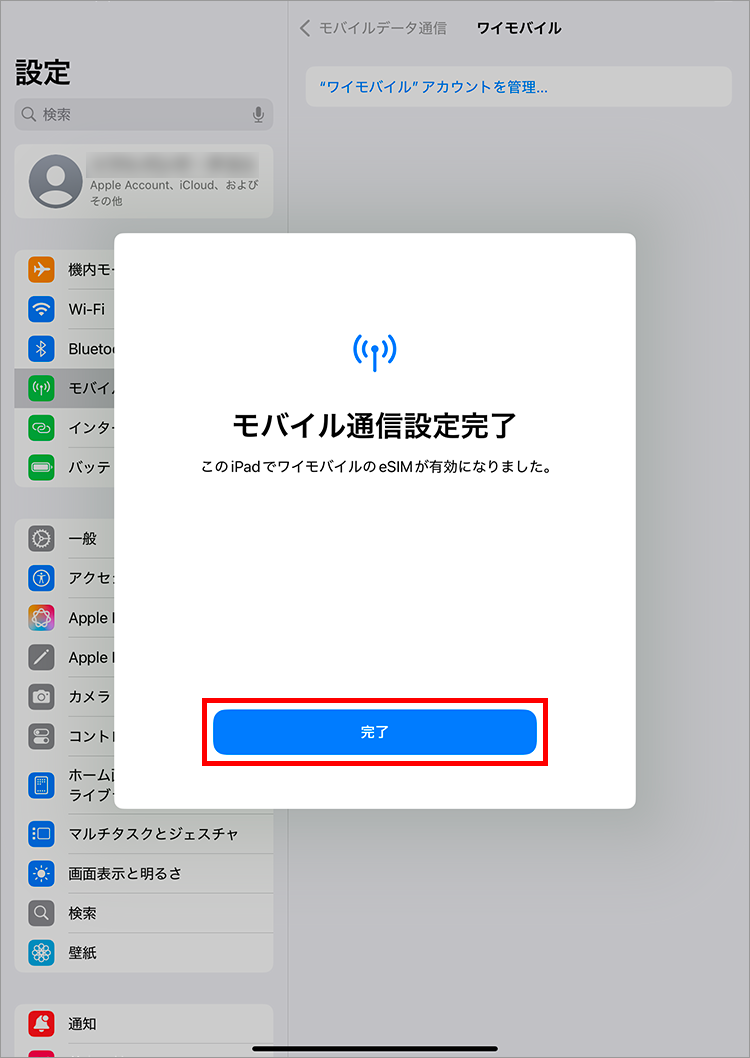
4. When this screen appears, tap "Done" to restart your device. Once complete, remove the SIM card.
This completes the setup.
1. Enter your mobile phone number and My Y!mobile password and tap "Log in"
2. After reading the terms and conditions, tap "Agree to all"
3. Once the application is complete, the following screen will be displayed and you will receive an email confirming that your line has been activated.
Please make sure that the Bluetooth setting is turned on on both your old iPhone and your new iPhone.
1. Tap "Settings"

2. Tap "Mobile Data"
3. Tap "Set up mobile data"

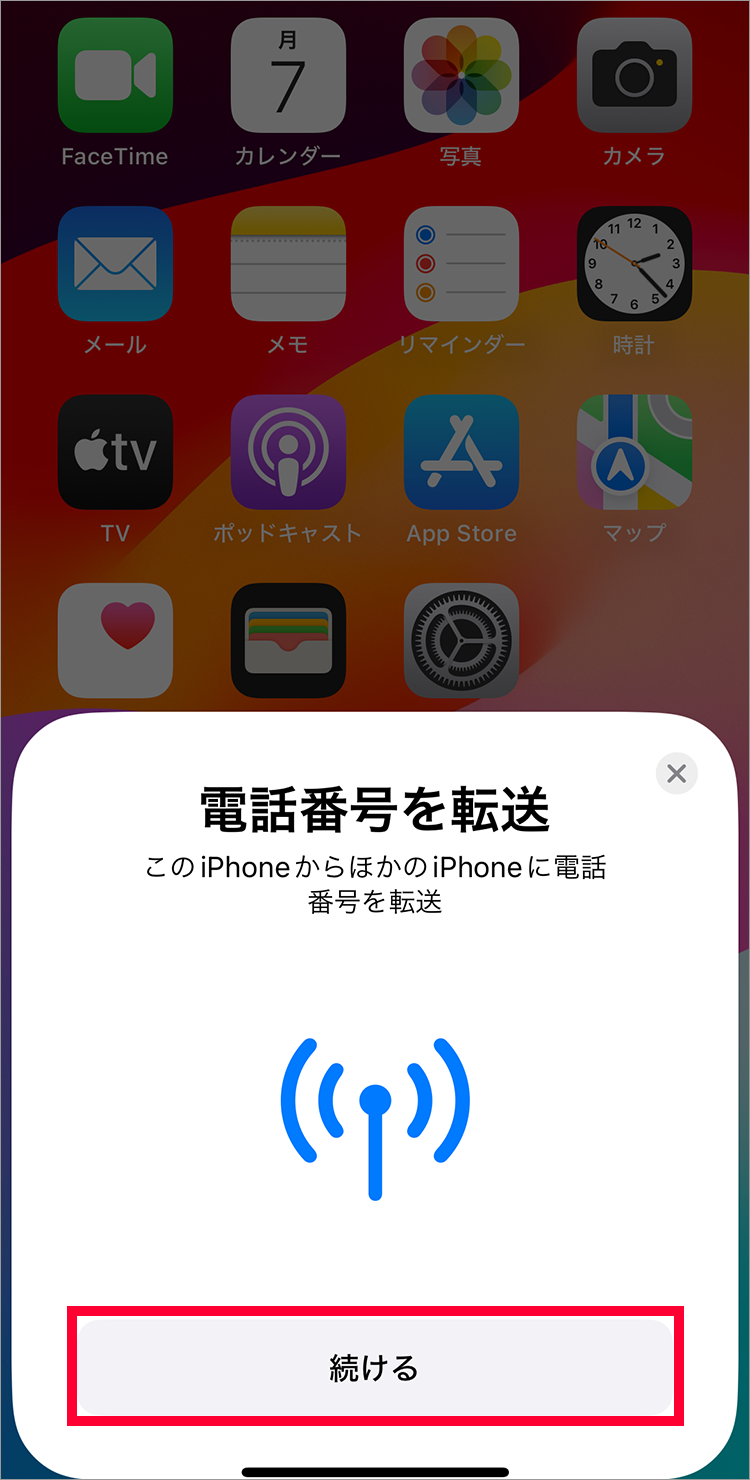
4. Tap "Transfer from Nearby iPhone"
5. The following screen will be displayed during the transfer

6. When the following screen appears, tap "Continue"
7. Enter the "Verification Code" displayed on your new iPhone
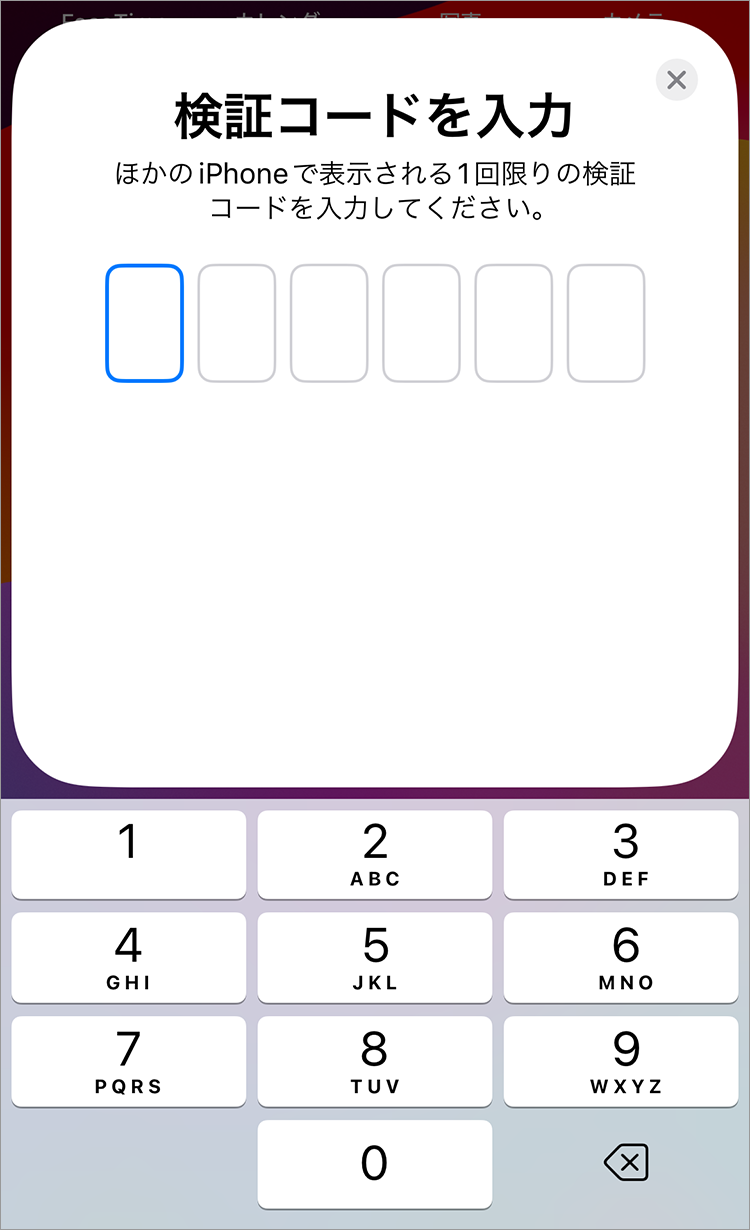
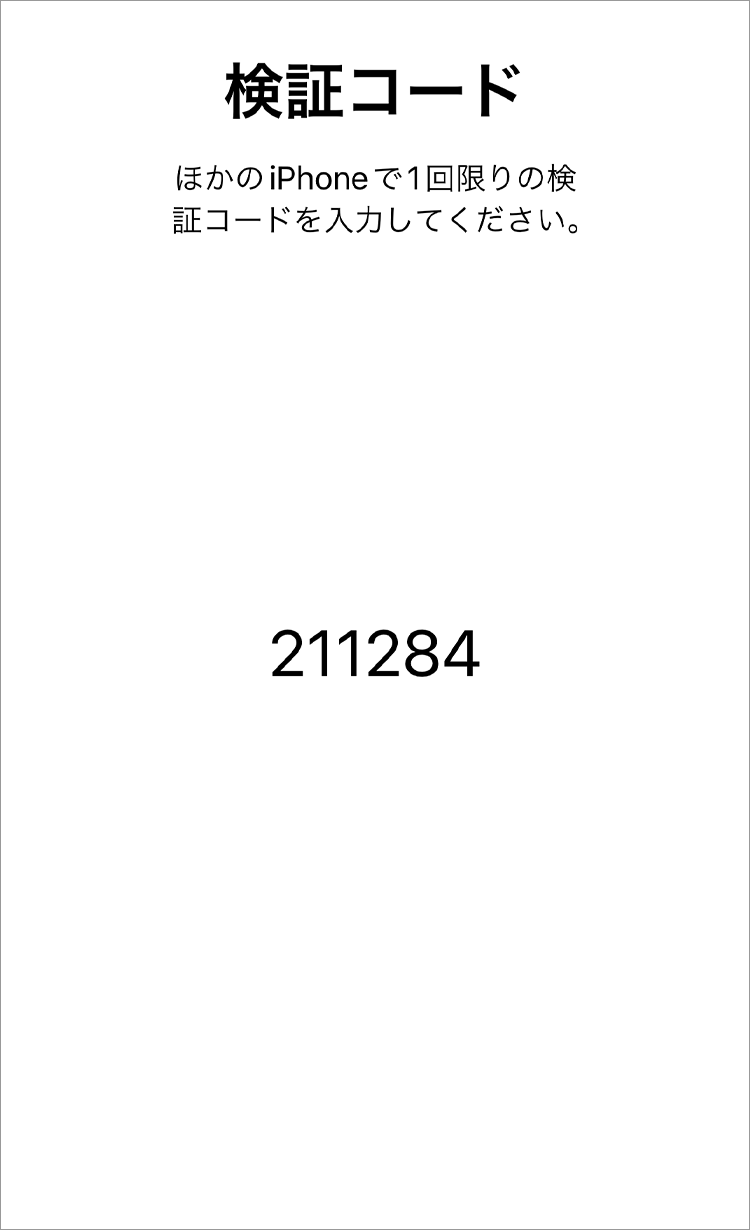
8. A "Verification Code" will be displayed
9. Tap "Transfer from another iPhone"
10. Tap "Transfer Number"
1. Enter the 4-digit PIN you set during the contract and tap "Continue".
2. Review the important notes and select "I agree".
3. "Activating..." or "Connecting to network..." will be displayed.
1. Enter your mobile phone number and My Y!mobile password and tap "Log in"
2. After reading the terms and conditions, tap "Agree to all"
3. Once the application is complete, the following screen will be displayed and you will receive an email confirming that your line has been activated.
4. Tap "Continue"
5. When this screen appears, tap "Done" and restart the device.
This completes the setup.
1. Tap "Settings"
2. Tap "Mobile Data"
3. Tap "Change to eSIM"
4. Tap "Change to eSIM"
5. Tap "Change to eSIM"
1. Enter the 4-digit PIN you set during the contract and tap "Continue".
2. Review the important notes and select "I agree".
3. "Activating..." or "Connecting to network..." will be displayed.
4. When this screen appears, tap "Done" to restart your device. Once complete, remove the SIM card.
This completes the setup.
1. Enter your mobile phone number and My Y!mobile password and tap "Log in"
2. After reading the terms and conditions, tap "Agree to all"
3. Once the application is complete, the following screen will be displayed and you will receive an email confirming that your line has been activated.
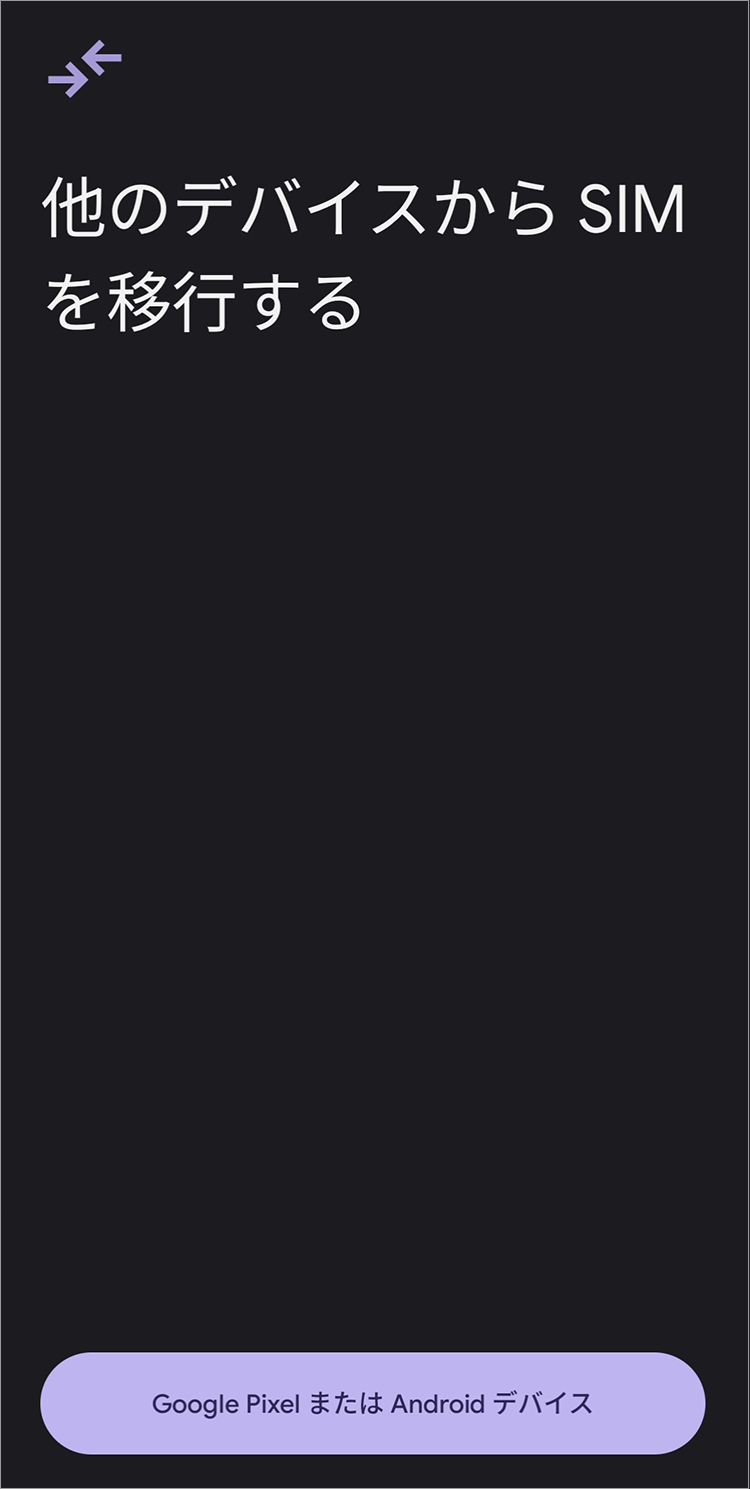
This applies only when using a line contracted with SoftBank, Y!mobile, or LINEMO on the following devices purchased from SoftBank or Y!mobile
Google Pixel 8 series and later (Android™ 16 or later)
Xperia series (Android™ 15 or later)
AQUOS series (Android™ 15 or later)
LEITZ PHONE3 (Android™ 15 and above)
nubia, Libero series (Android™ 15 or later)
REDMI 15 5G (Android™ 15 and above)
arrows We2 (Android™ 16 or later)
OPPO Reno series, Oppo A series (Android™ 16 or later)
Galaxy S26 series and later (Android™ 16 or later)
moto g series (Android™ 16 or later)
Motorola razr series, edge series (Android™ 16 or later)
Natural AI Phone (Android™ 15 and above)
Please ensure you have a Wi-Fi connection before proceeding with the setup. A Wi-Fi connection is required when downloading the eSIM.
When performing an Android eSIM transfer, please do so in a location with good signal strength and without moving to avoid communication interruptions.
Please update to the latest software.
Please take the following steps on both your old and new smartphones.
Turn on the screen lock setting.
Turn on Bluetooth
The screenshots shown are from a Google Pixel device. Screen displays may vary depending on your device and operating system.
Please do not reset your smartphone before the eSIM reissuance process is complete. Resetting your smartphone will prevent the eSIM reissuance from being completed.
* After transferring the SIM to an Android eSIM, the SIM card in the device you were originally using will become invalid.
・You cannot change the SIM card to an eSIM on the same smartphone.
・After completing the initial setup of your new smartphone, please perform the following settings.
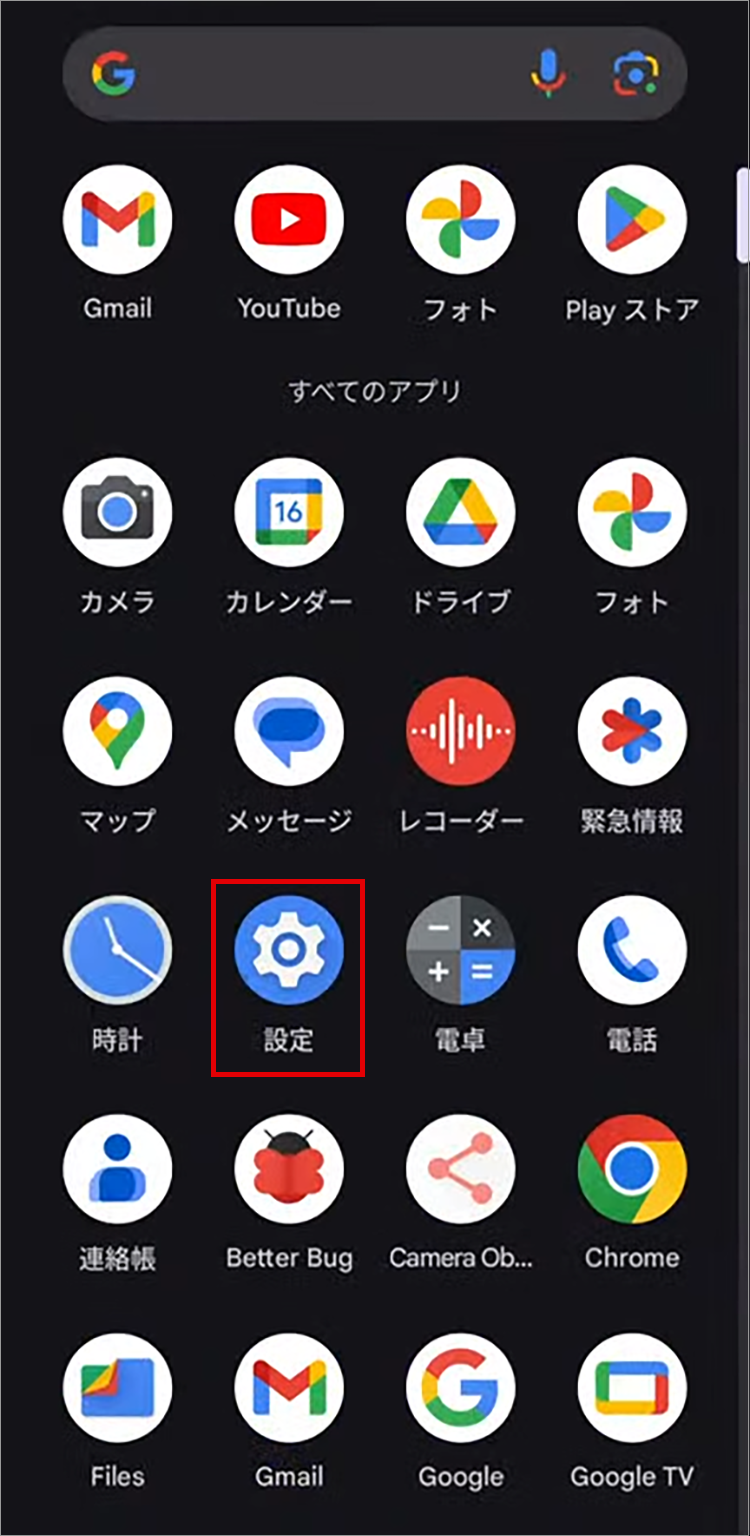
1. Tap "Settings app" from the home screen
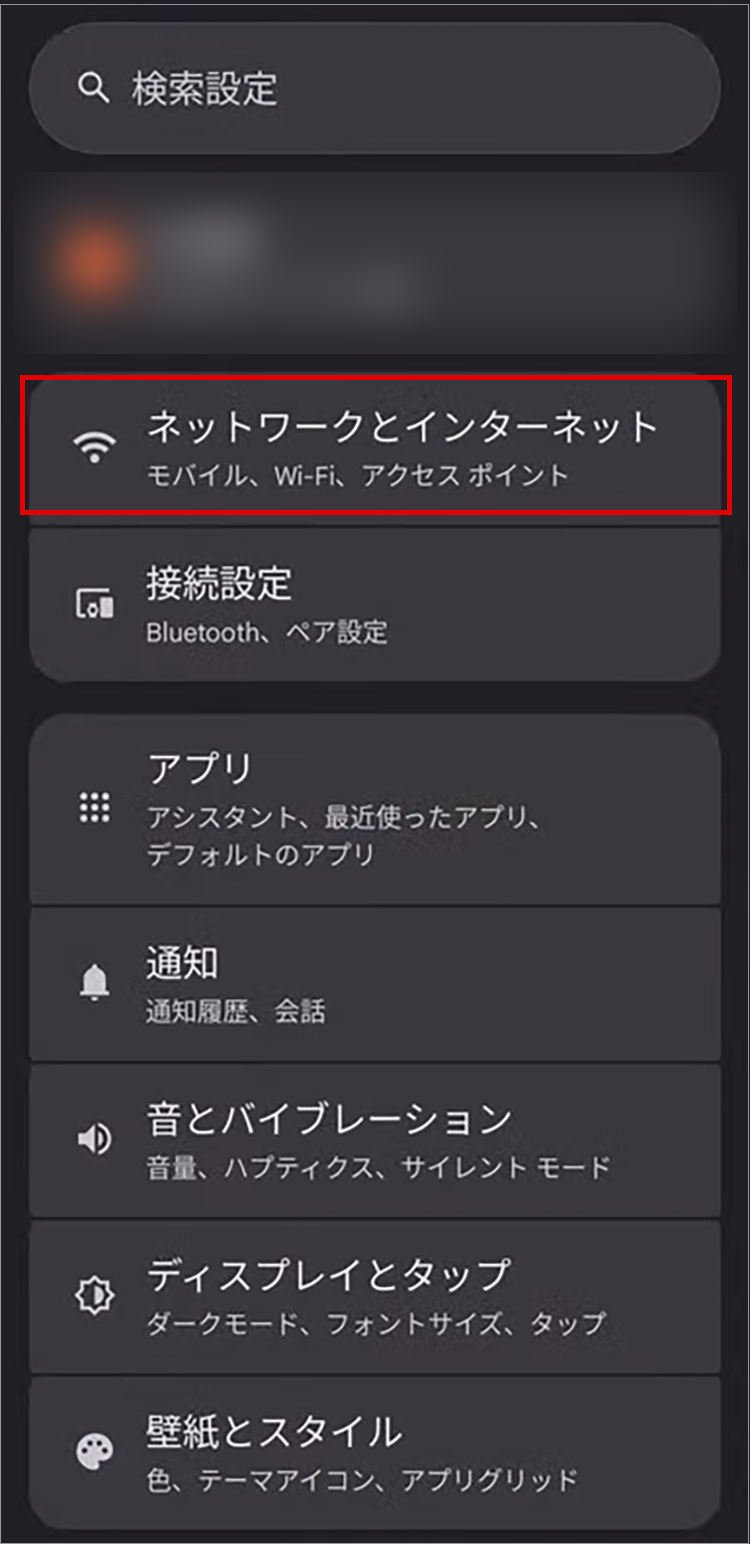
2. Tap "Network and Internet"
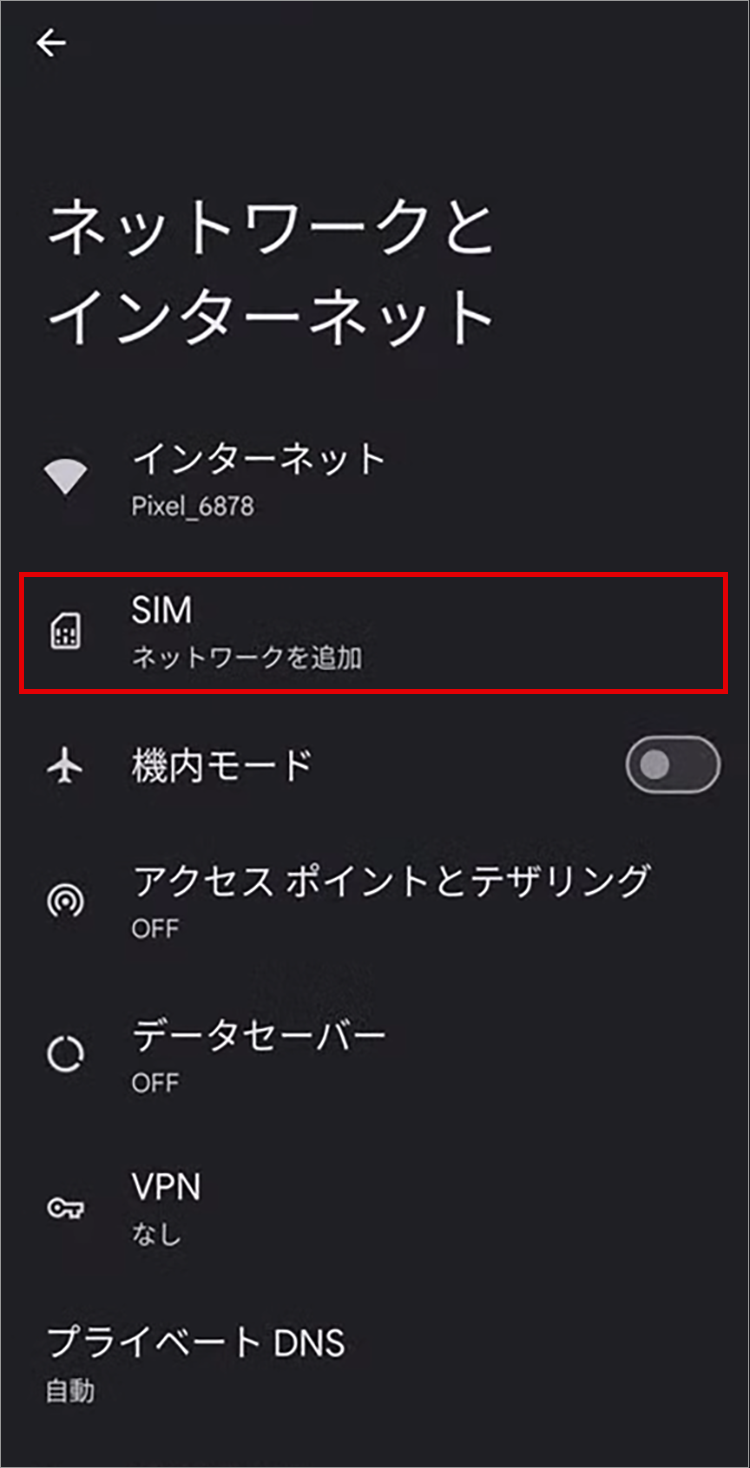
3. Tap "SIM"
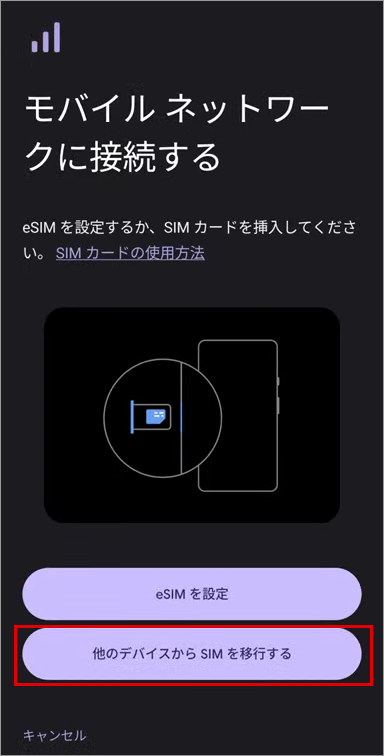
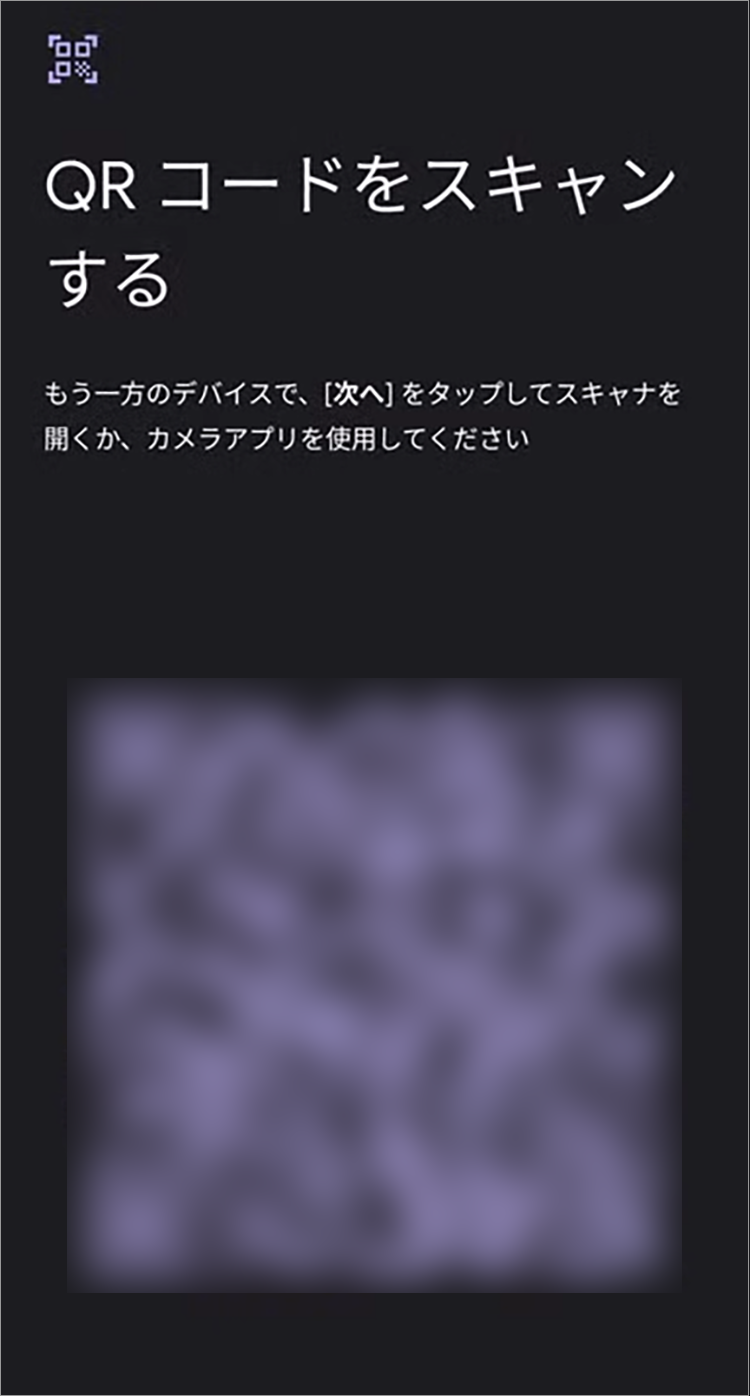
4. Tap "Transfer SIM from another device"
5. Unlock the Android smartphone you are using and bring it close
6. Tap "Next"
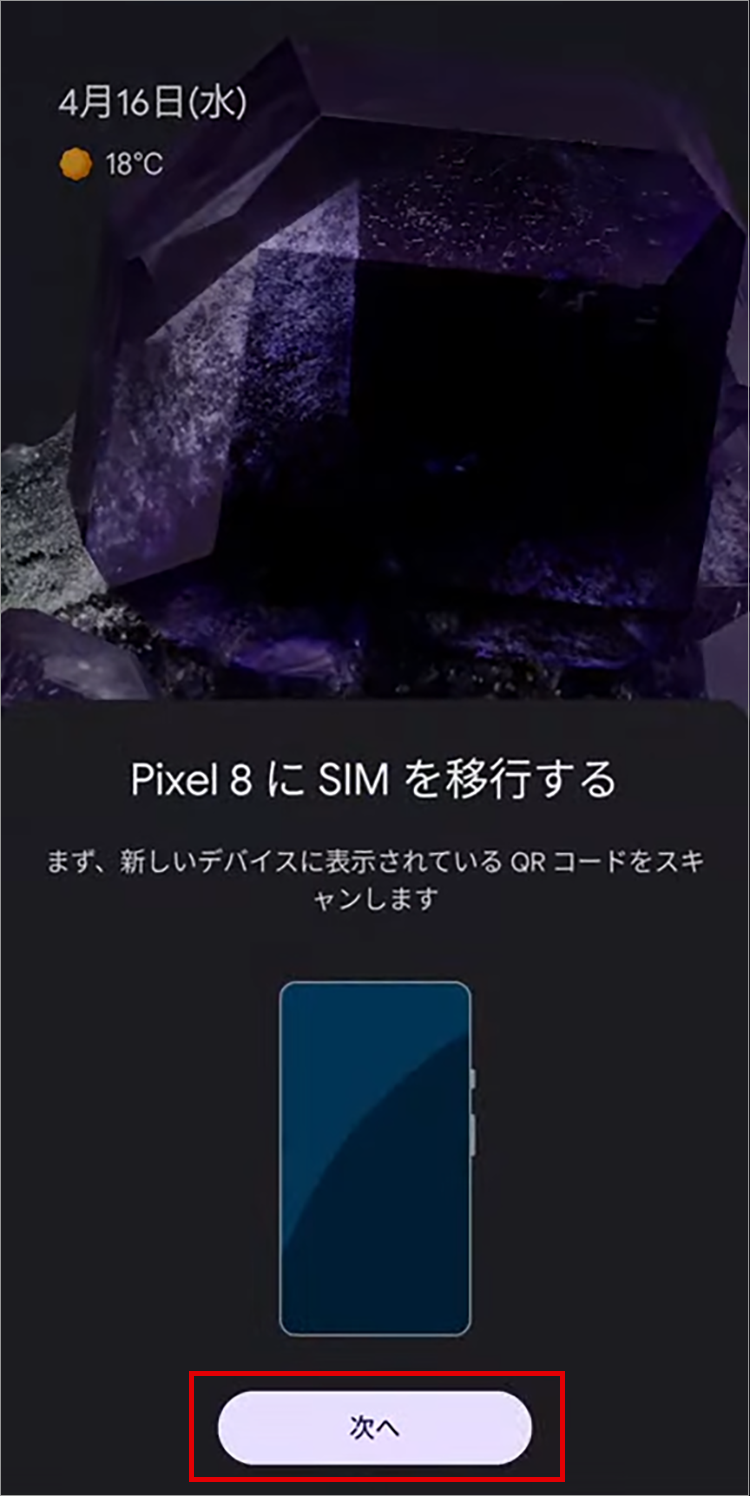
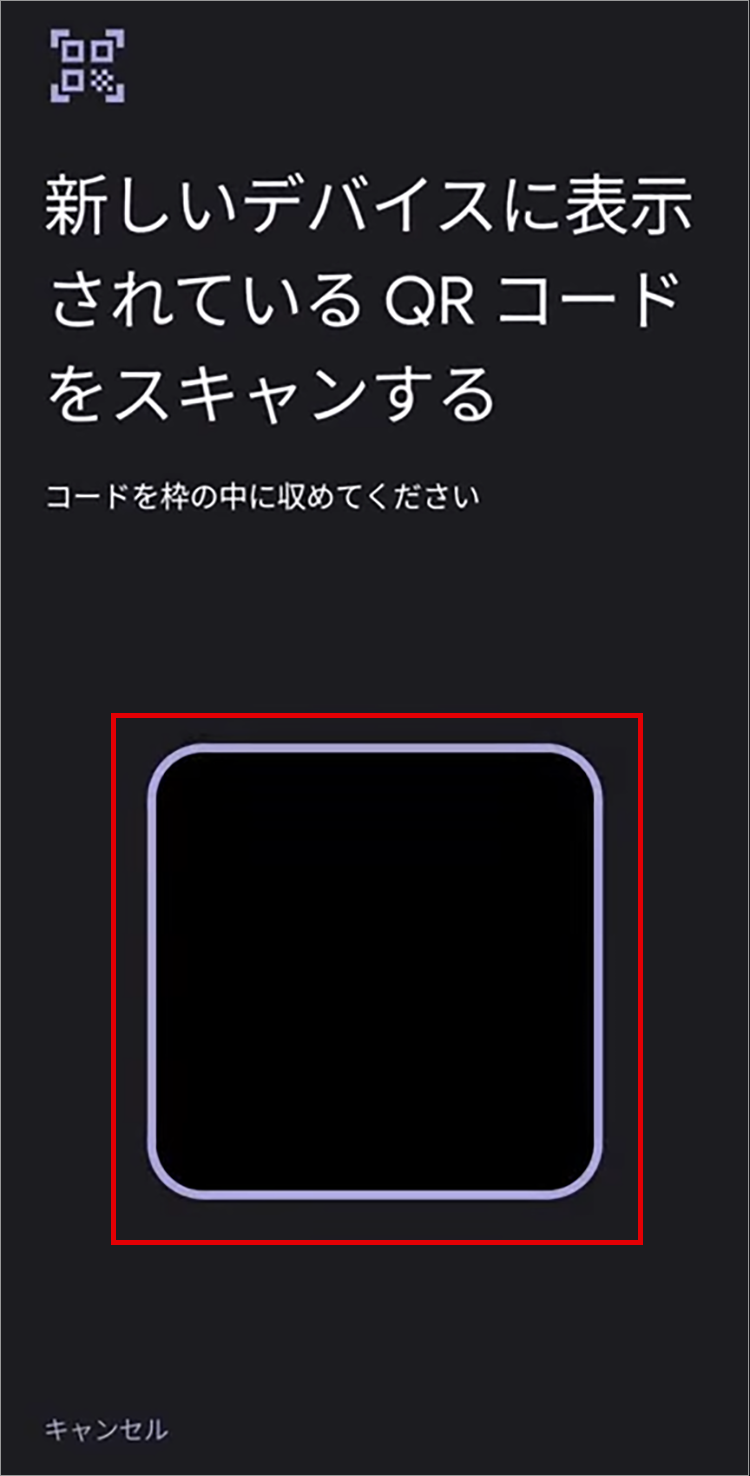
7. Scan the QR code displayed in step 5 in the frame.
8. Tap "Migrate"
Enter your PIN code on your Android device.
Wait for a while as the transfer will begin
9. Tap "Done"
eSIM Quick Transfer is available on iPads running iPadOS 17.2 or later.
* Compatible iPad models include 12.9-inch iPad Pro (3rd generation), 11-inch iPad Pro (1st generation), iPad Air (3rd generation), iPad (7th generation), and iPad mini (5th generation) and later.
Please update the OS version of your current device and any new devices you plan to use to iPadOS 17.2 or later.
Please prepare a Wi-Fi environment before performing the eSIM quick setup. A Wi-Fi connection is required when downloading the eSIM.
You must set a passcode for your iPad.
Do not reset your iPad before the eSIM reissue is complete. If you reset it, the eSIM cannot be reissued.
*Please note that operation is not guaranteed on any iPad other than those released in Japan.
* After eSIM quick transfer, the SIM on the original device will be invalidated.
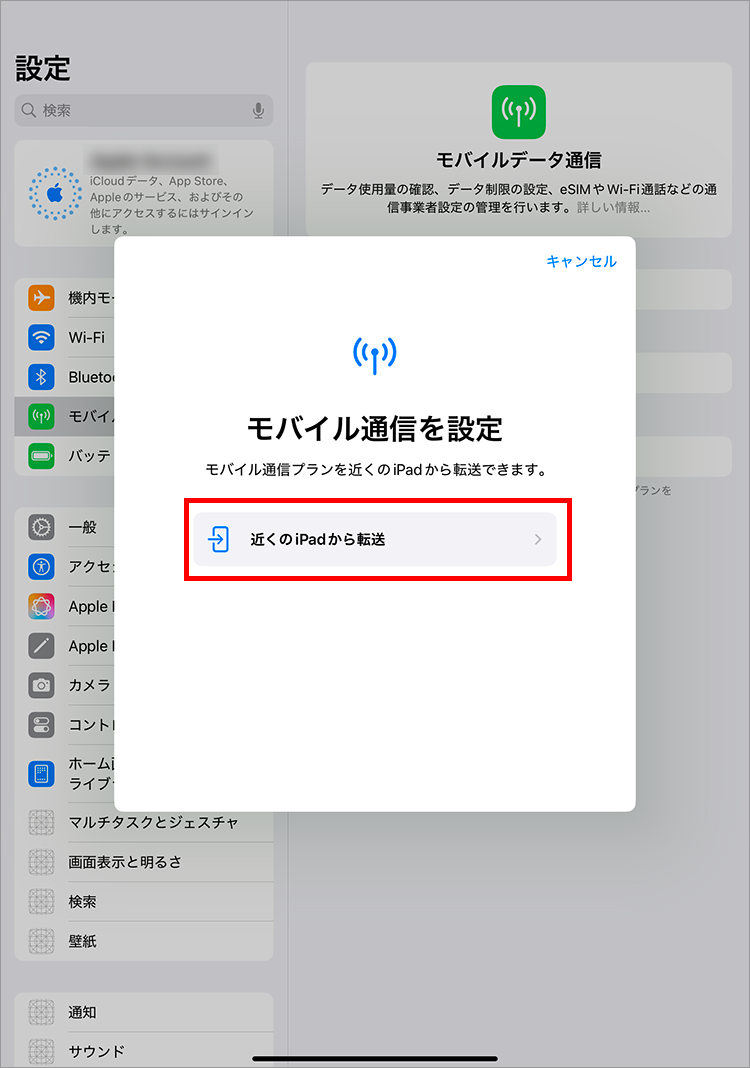
If you are transferring the eSIM to a new iPad, please perform the following settings after completing the initial setup of the new iPad.
Please sign in to the same Apple account on both your old and new iPads.
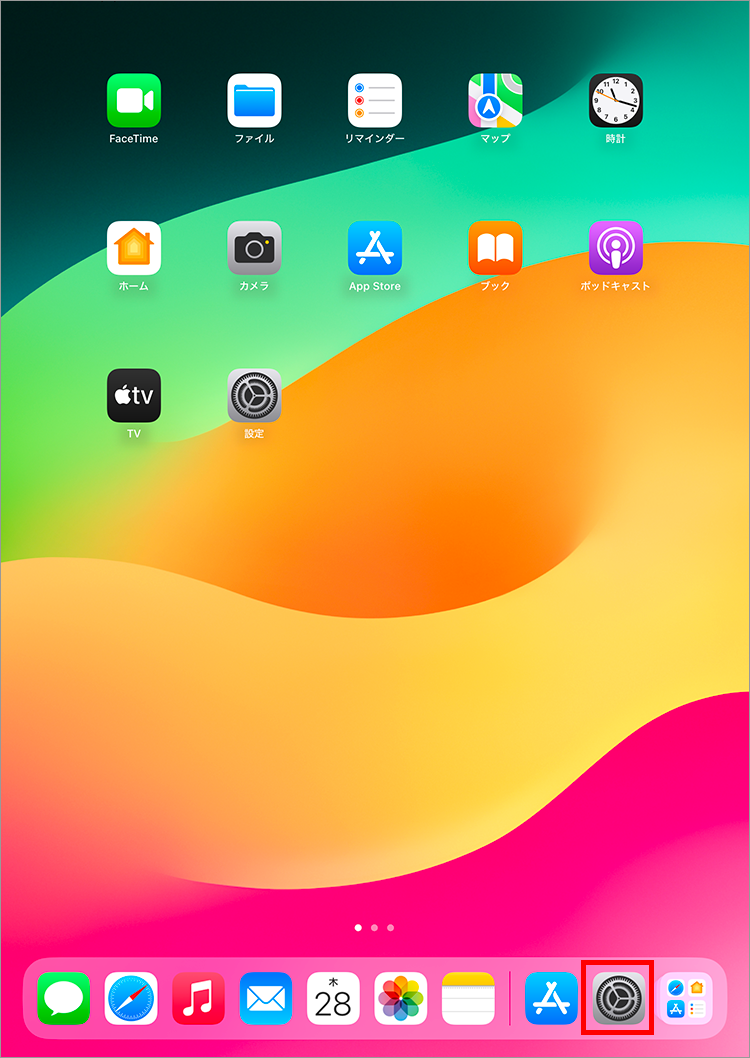
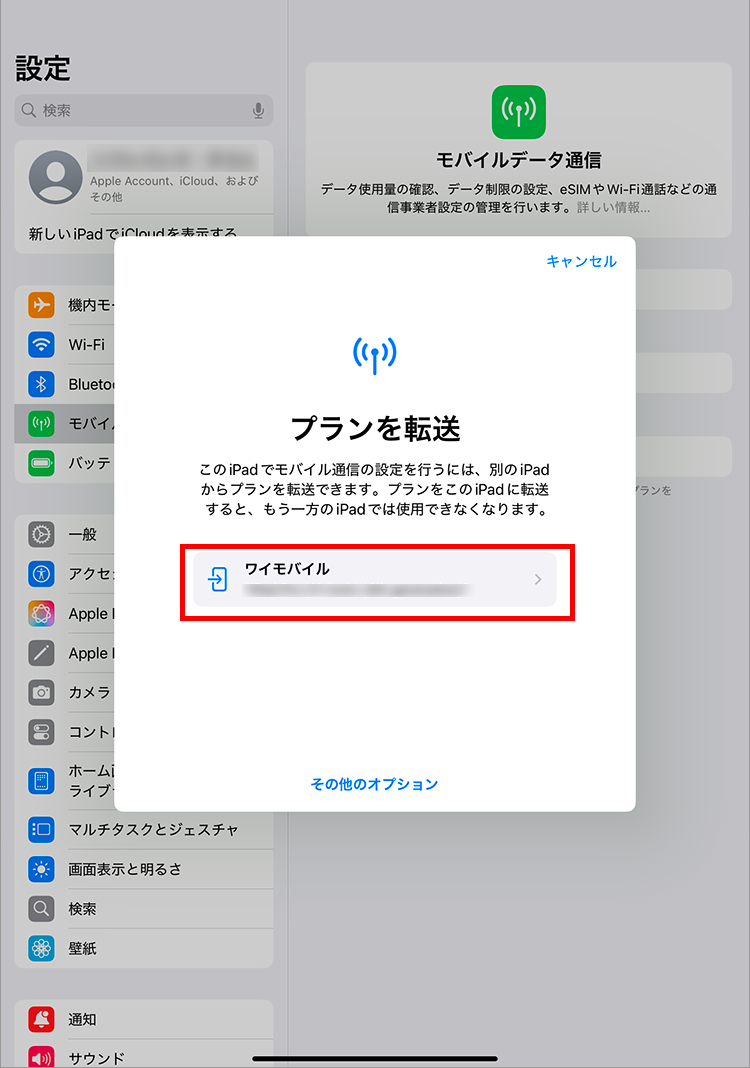
1. Tap "Settings"
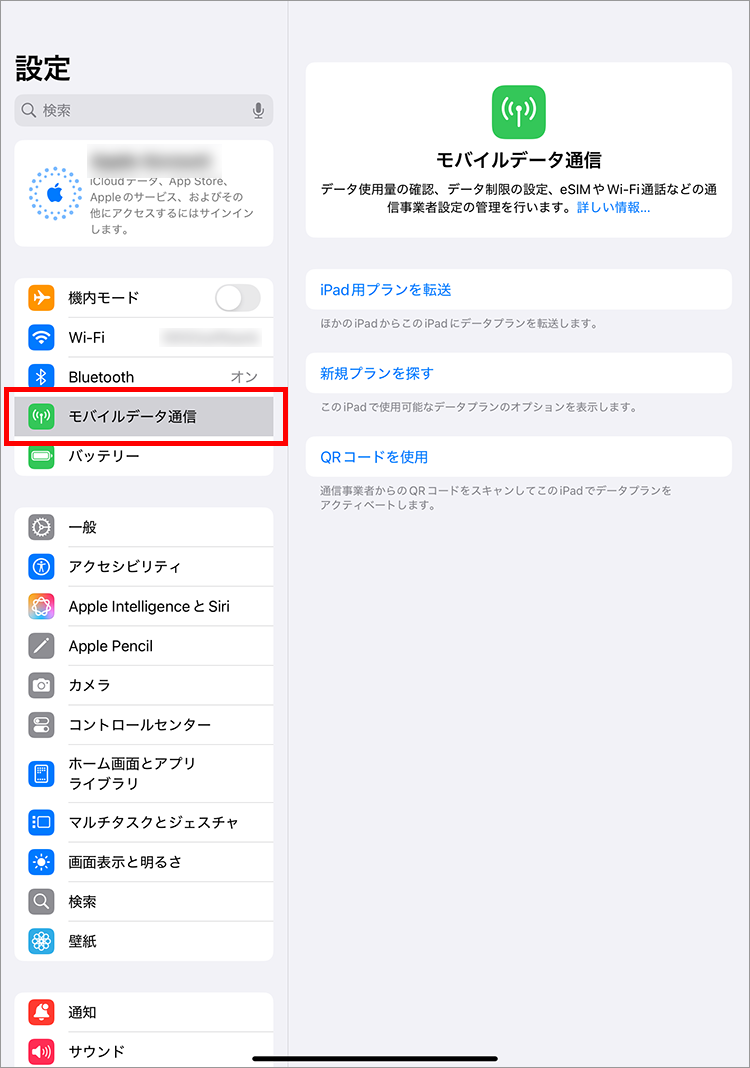
2. Tap "Transfer Plan for iPad" under "Mobile Data"
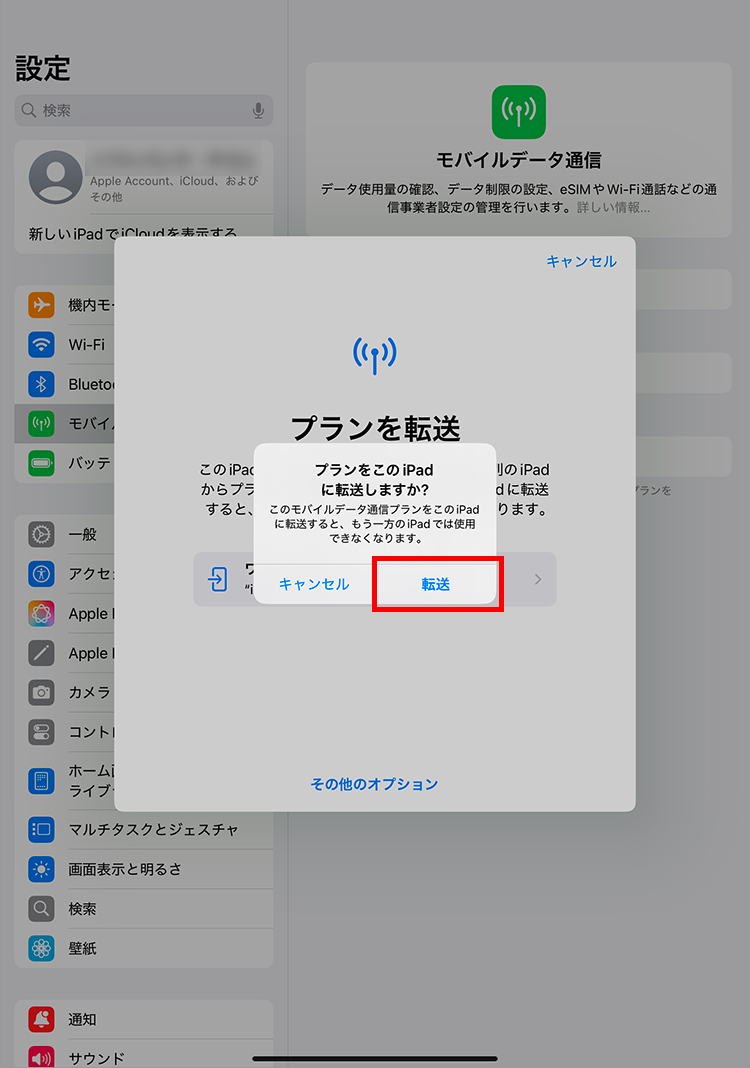
3. Select the SIM you want to transfer and tap "Continue"
4. Tap "Transfer"
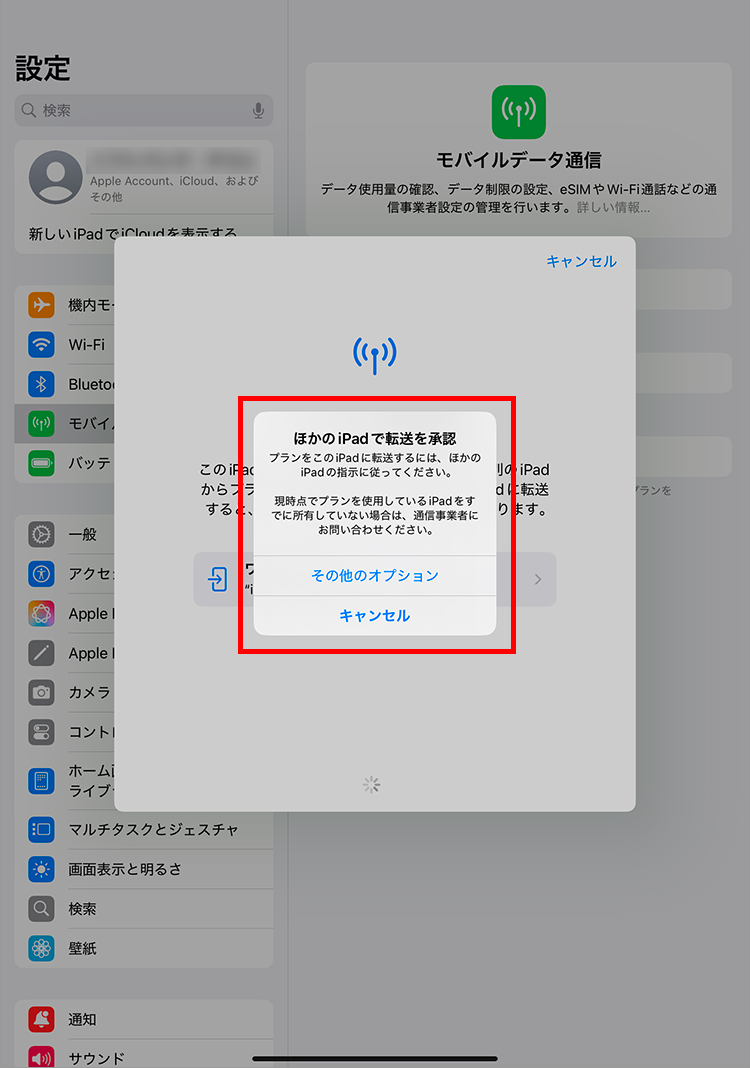
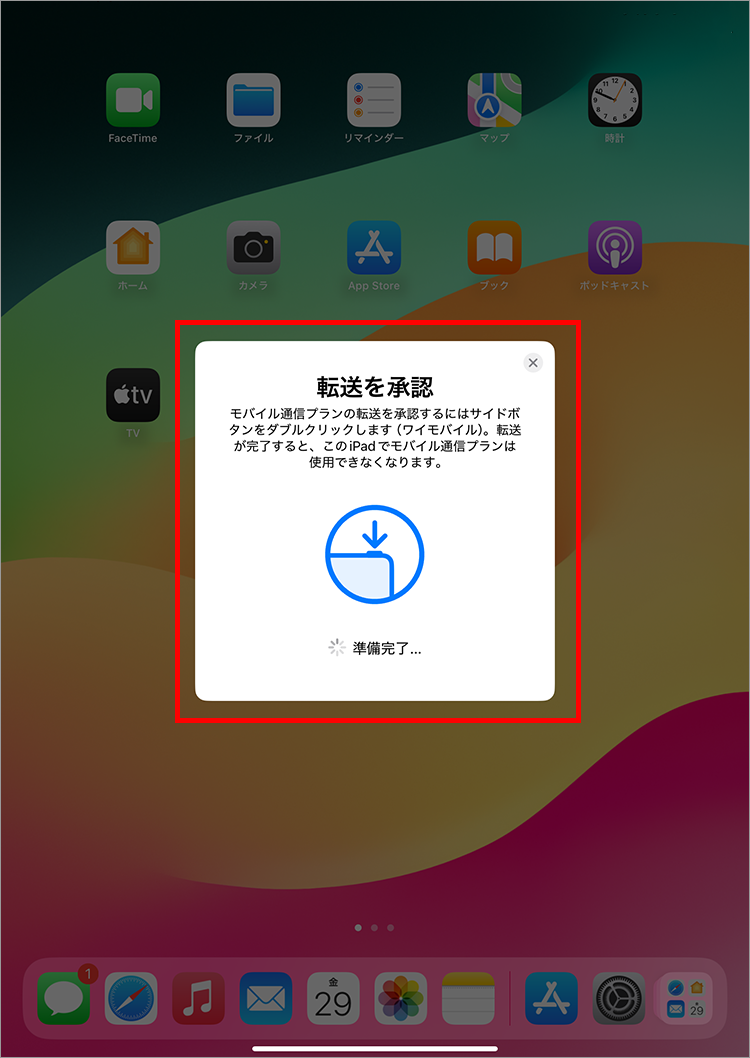
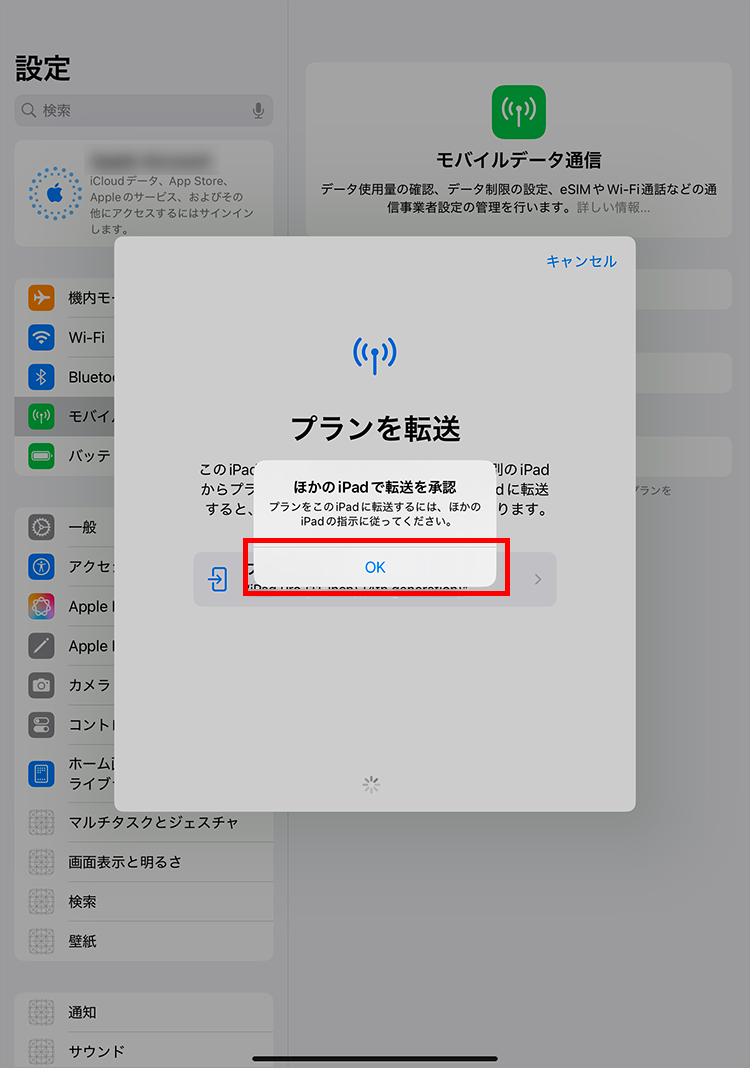
5. When the following screen appears, proceed to the next step for your iPad.
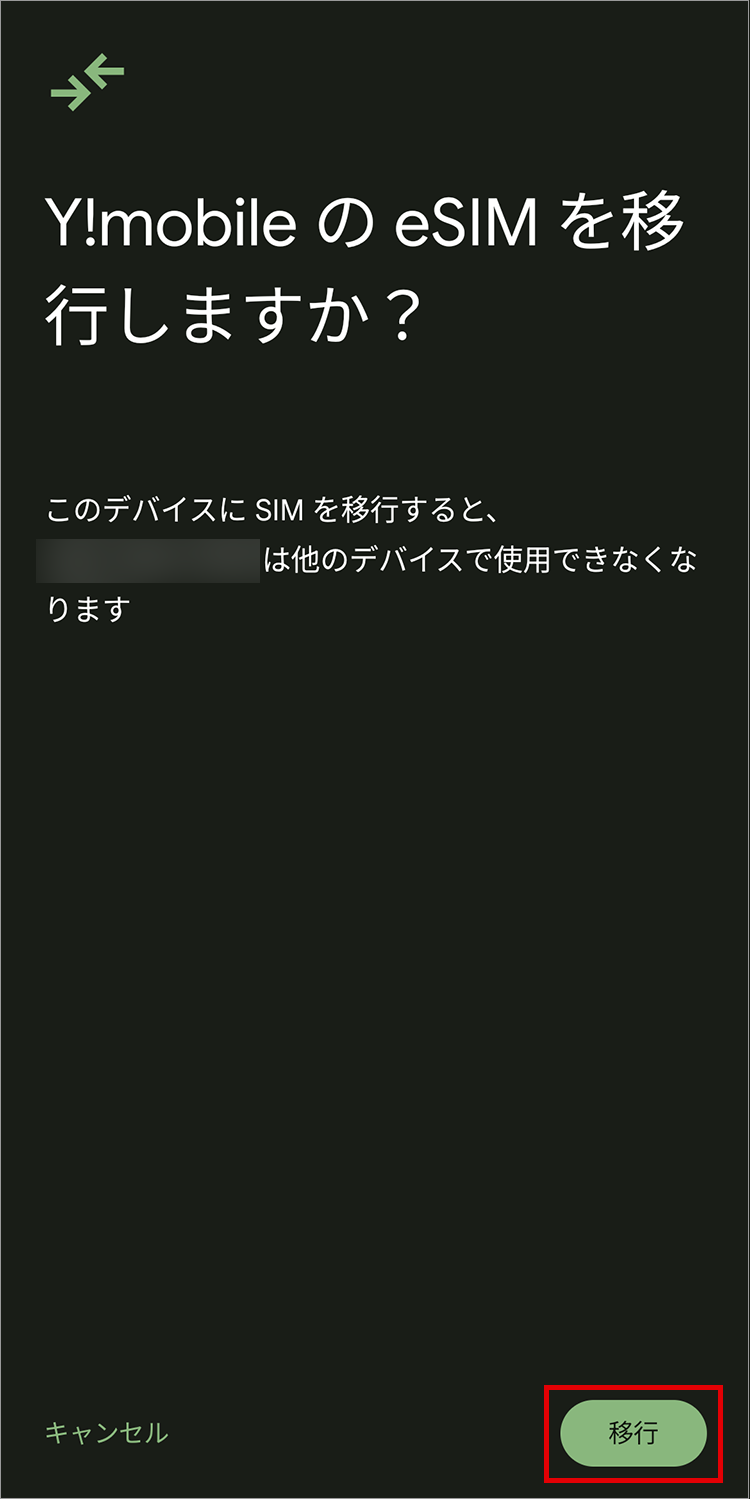
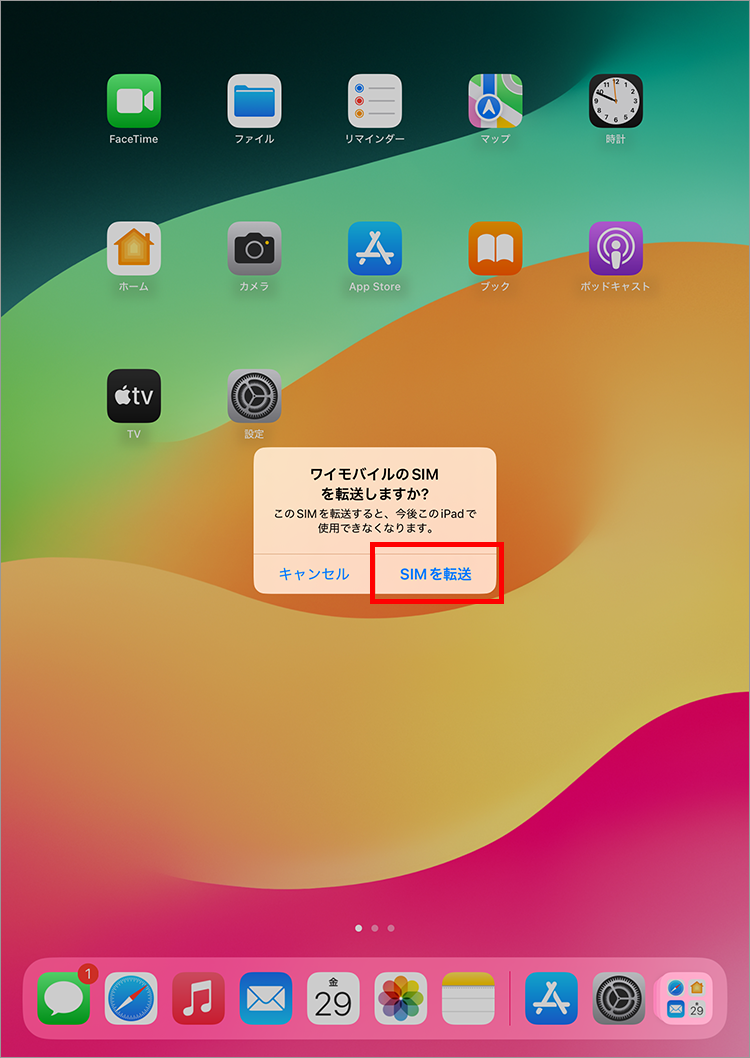
6. When the notification "Do you want to transfer Y!mobile SIM?" appears, tap "Transfer SIM."
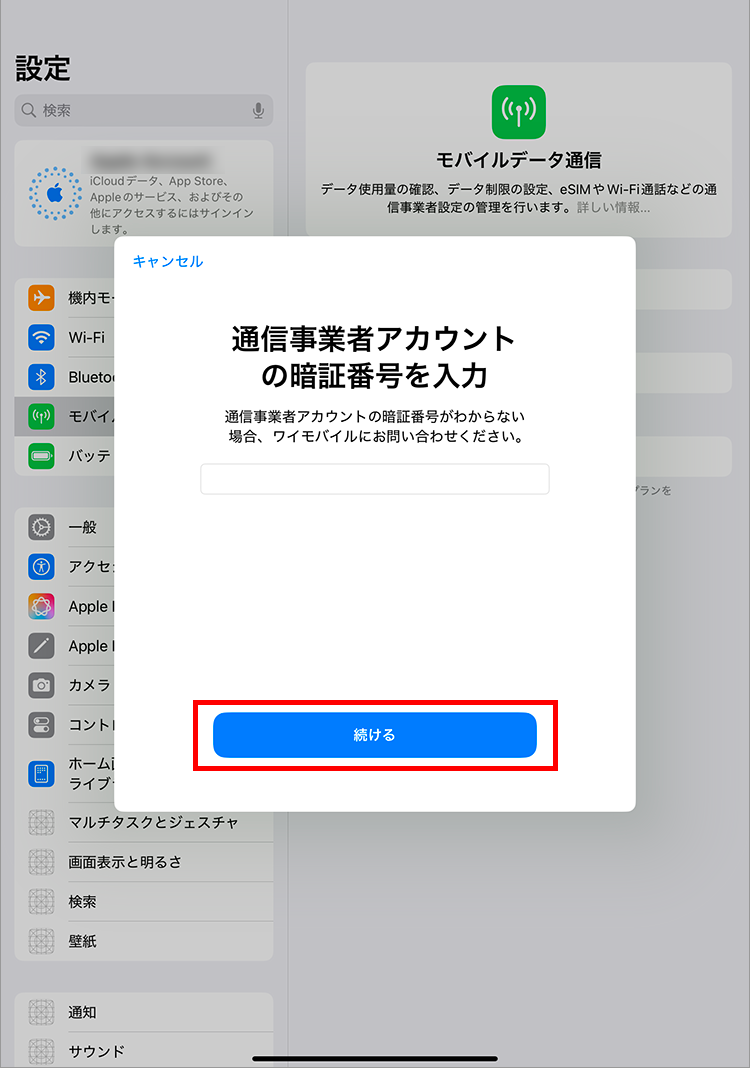
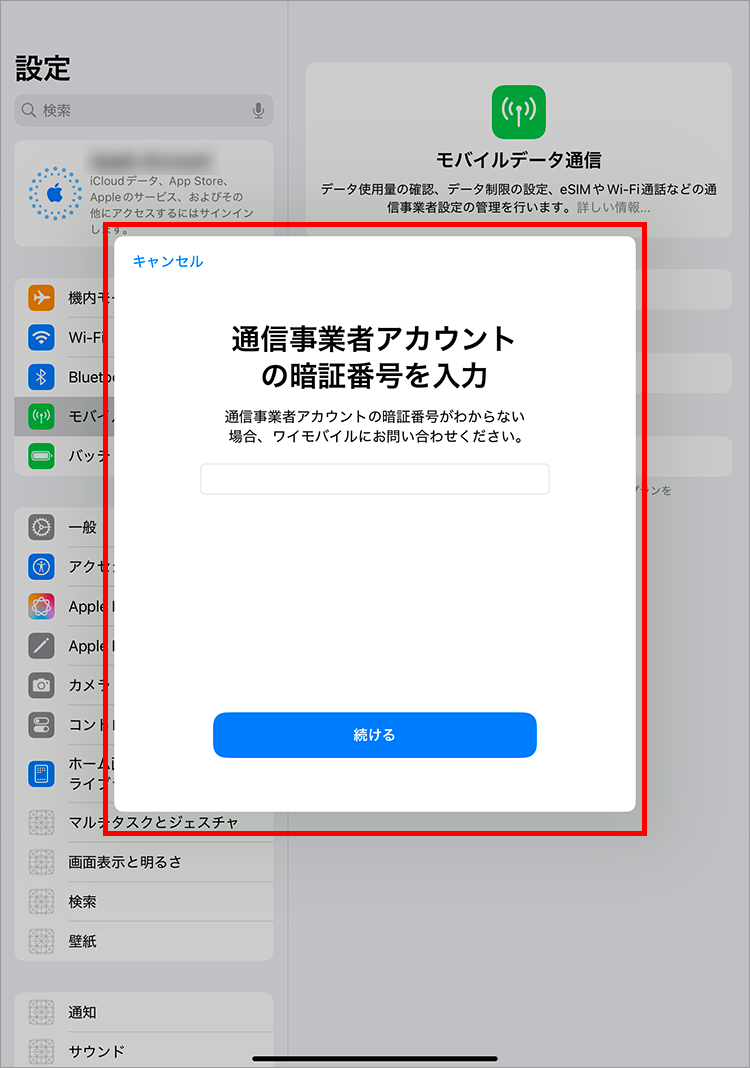
7. Enter the 4-digit PIN you set when signing the contract and tap "Continue"
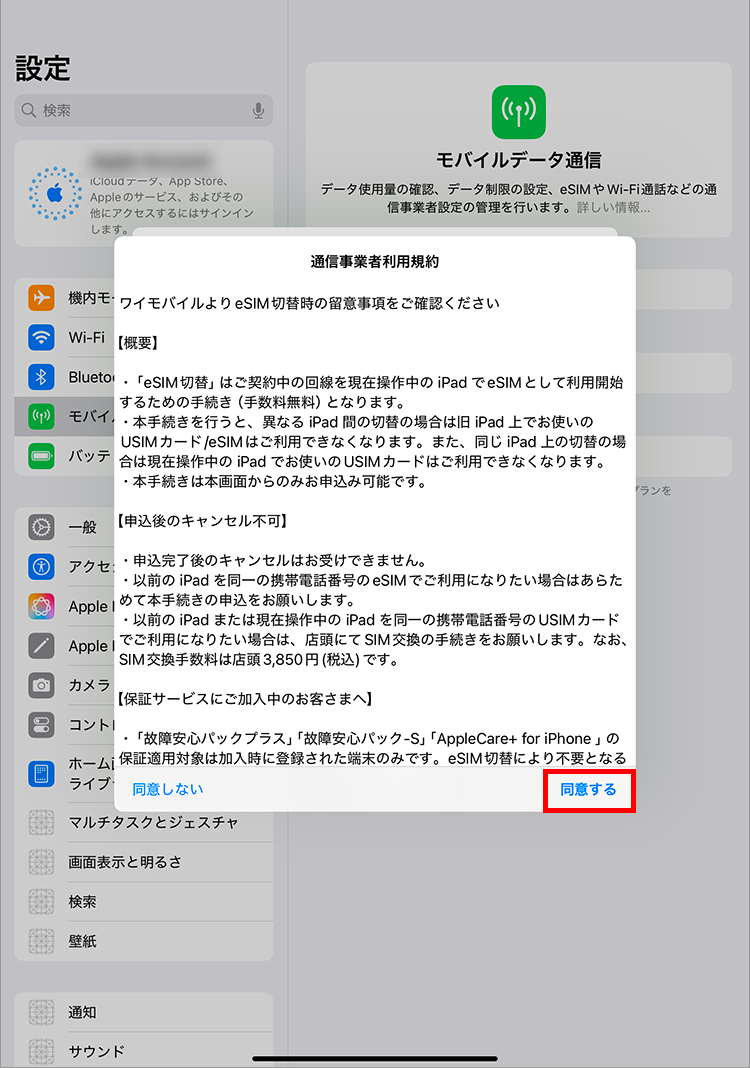
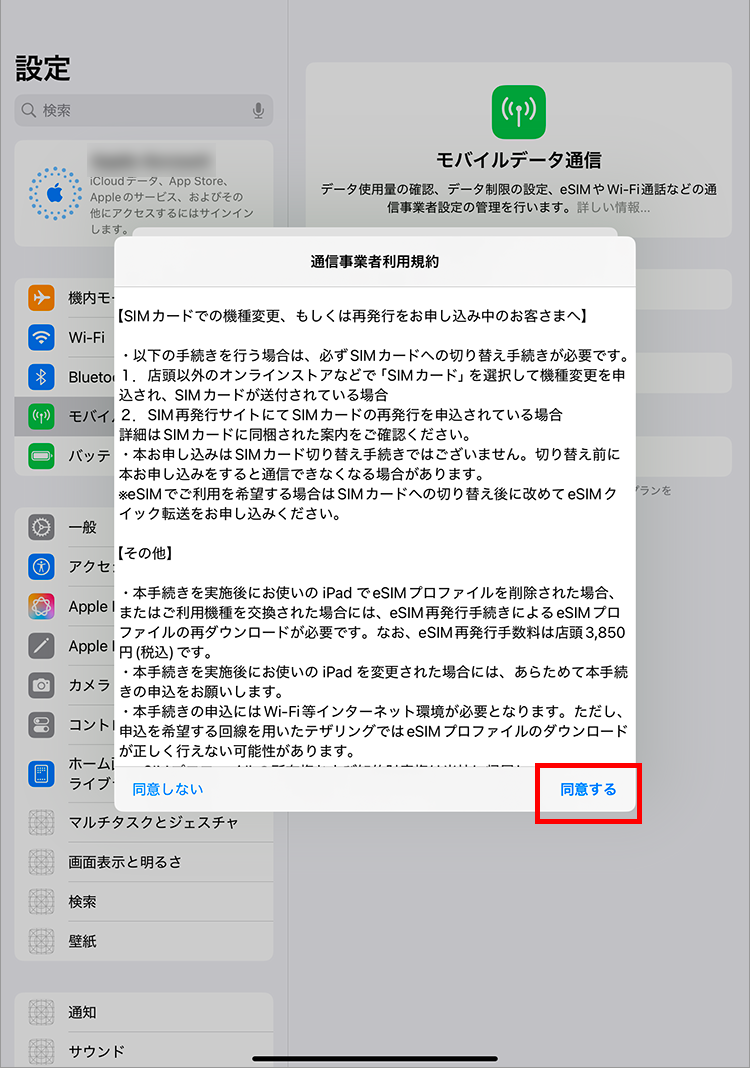
8. Check the terms of use and tap "Agree"
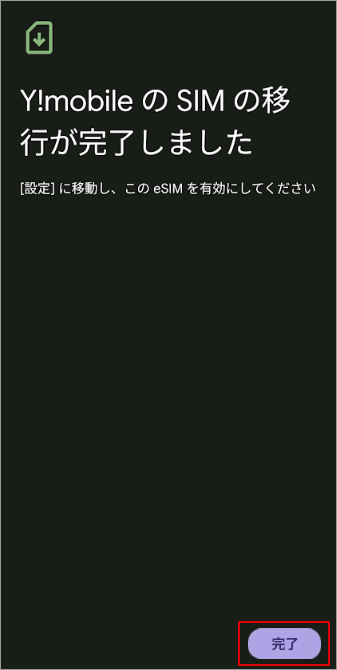
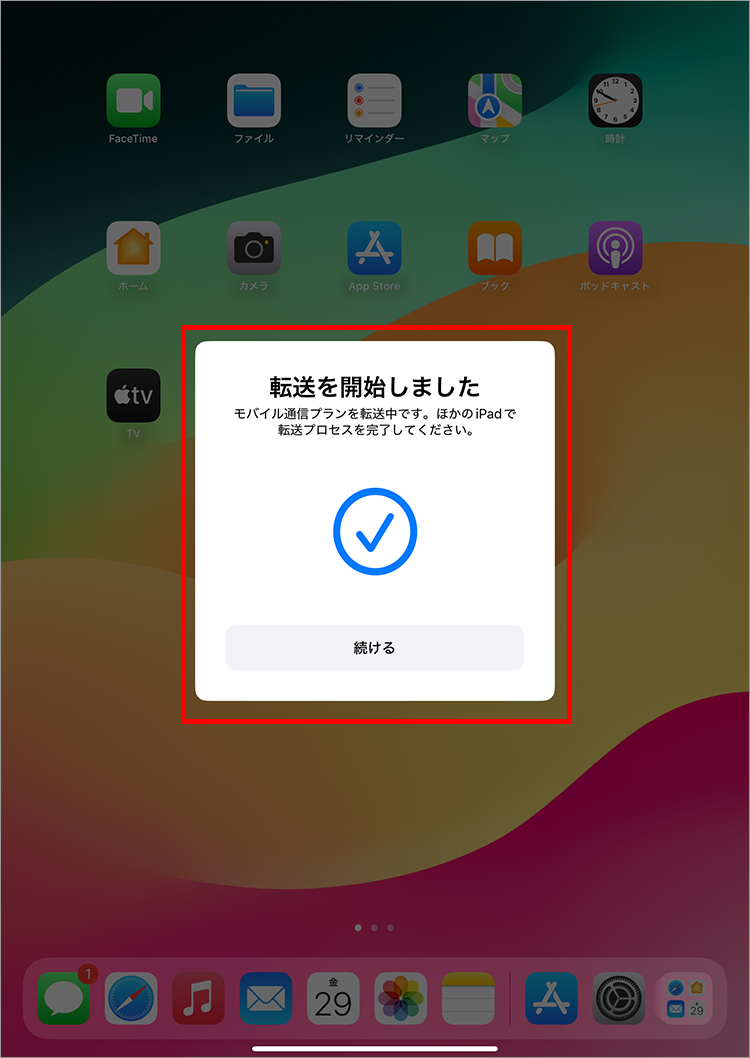
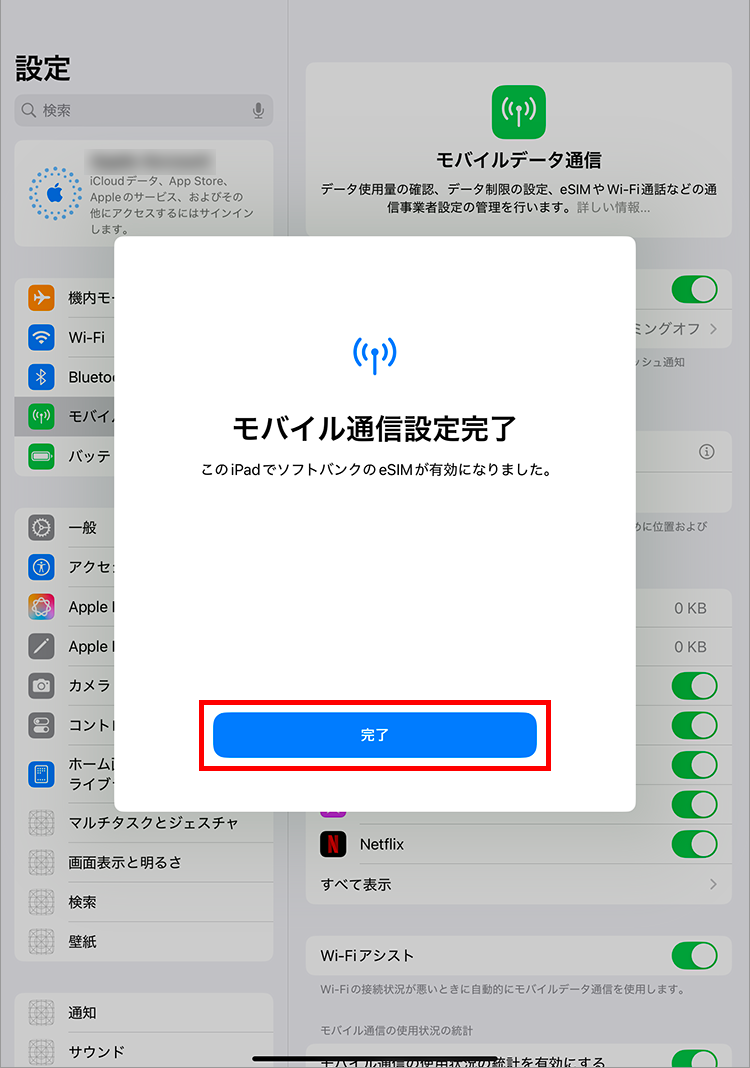
9. Once the application is complete, the following screen will be displayed.
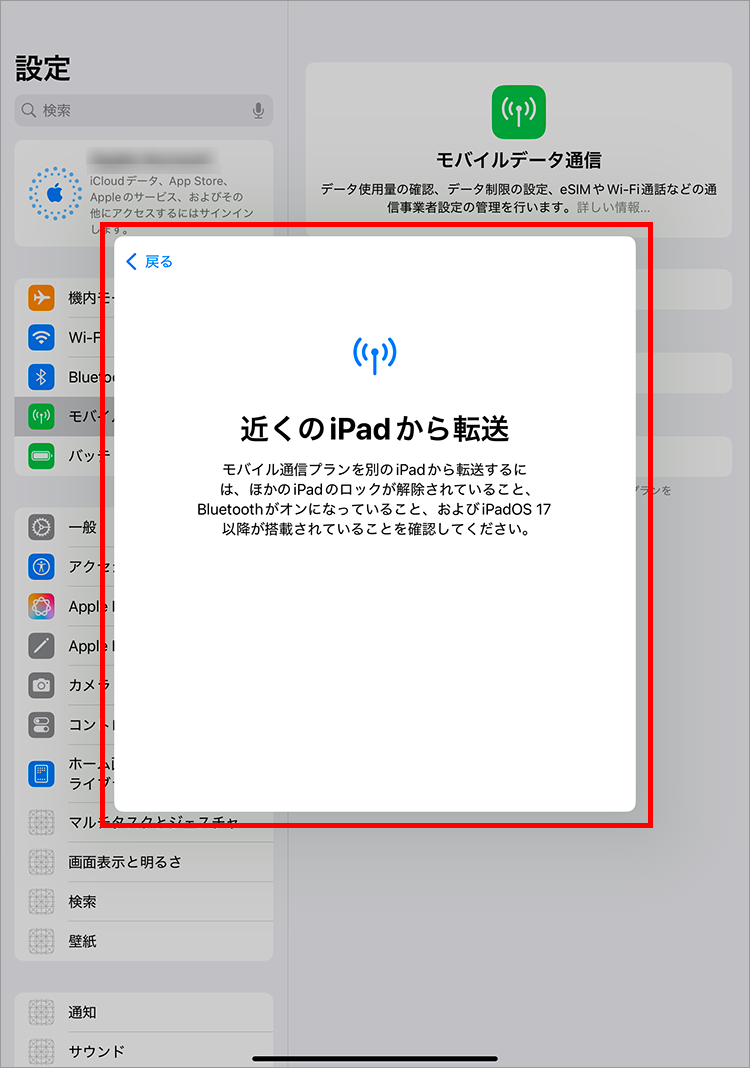
Please make sure that the Bluetooth setting is turned on on both your old iPad and your new iPad.
1. Tap "Settings"
2. Tap "Transfer Plan for iPad" under "Mobile Data"
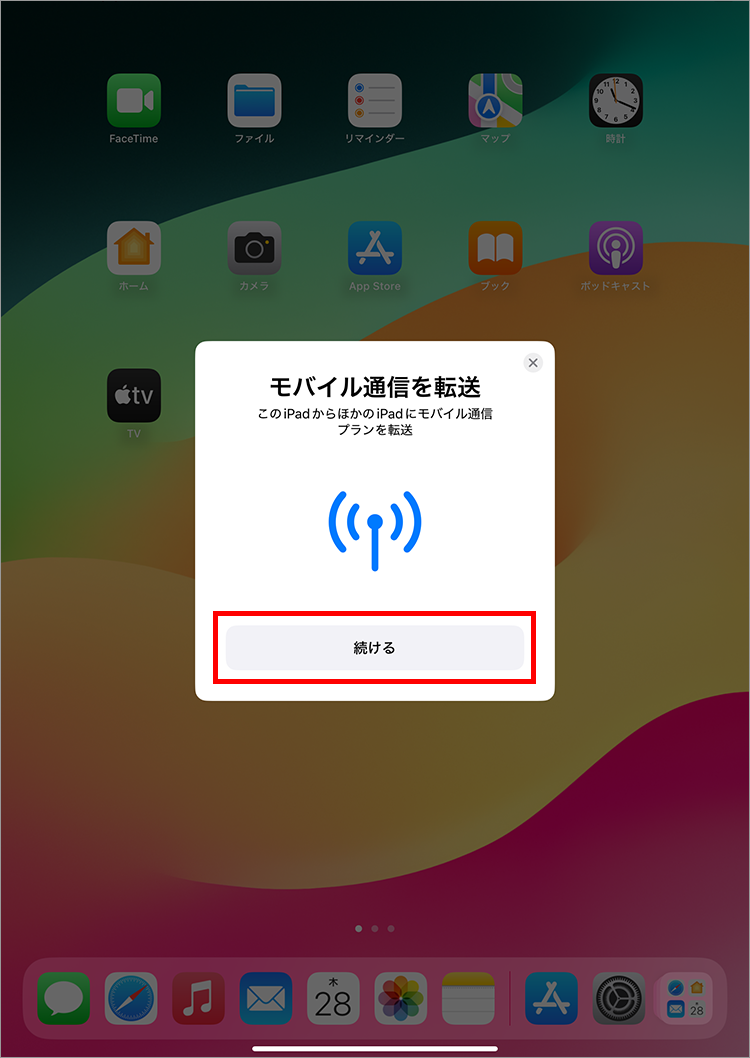
3. Tap "Transfer from nearby iPad"
4. When the following screen appears, proceed to the operation of your iPad.
5. When "Transfer Mobile Data" appears, tap "Continue."
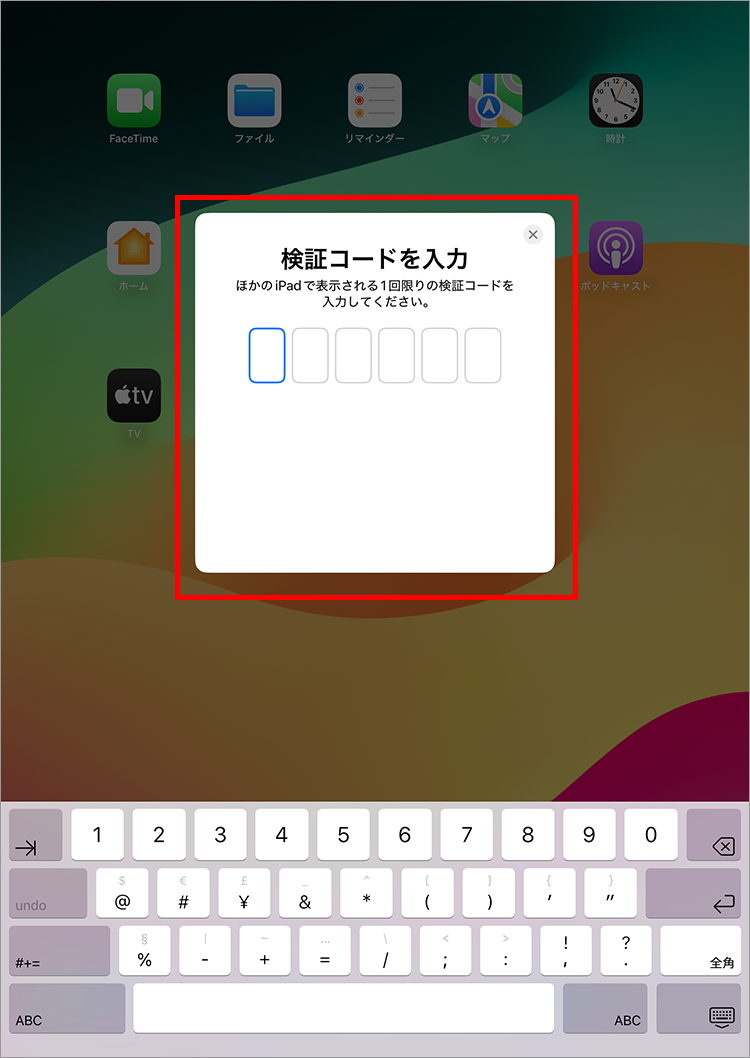
6. A verification code will be displayed.

7. Enter the verification code displayed on the new iPad you will be using.
8. Tap the eSIM you want to transfer from another iPad.
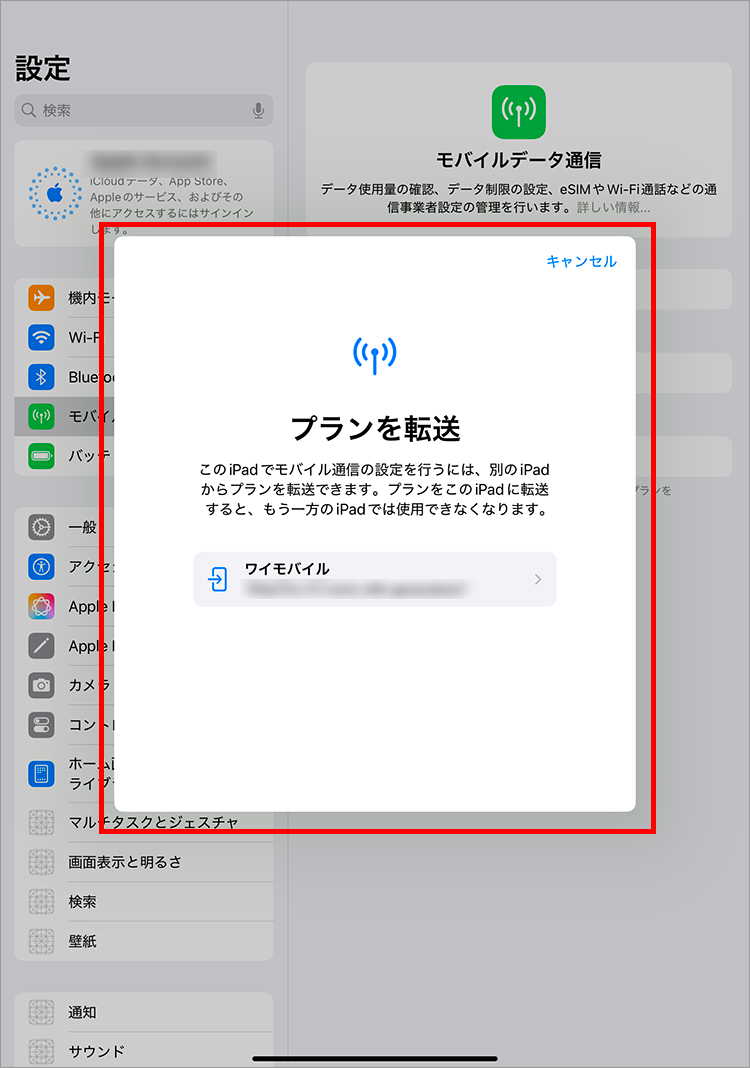
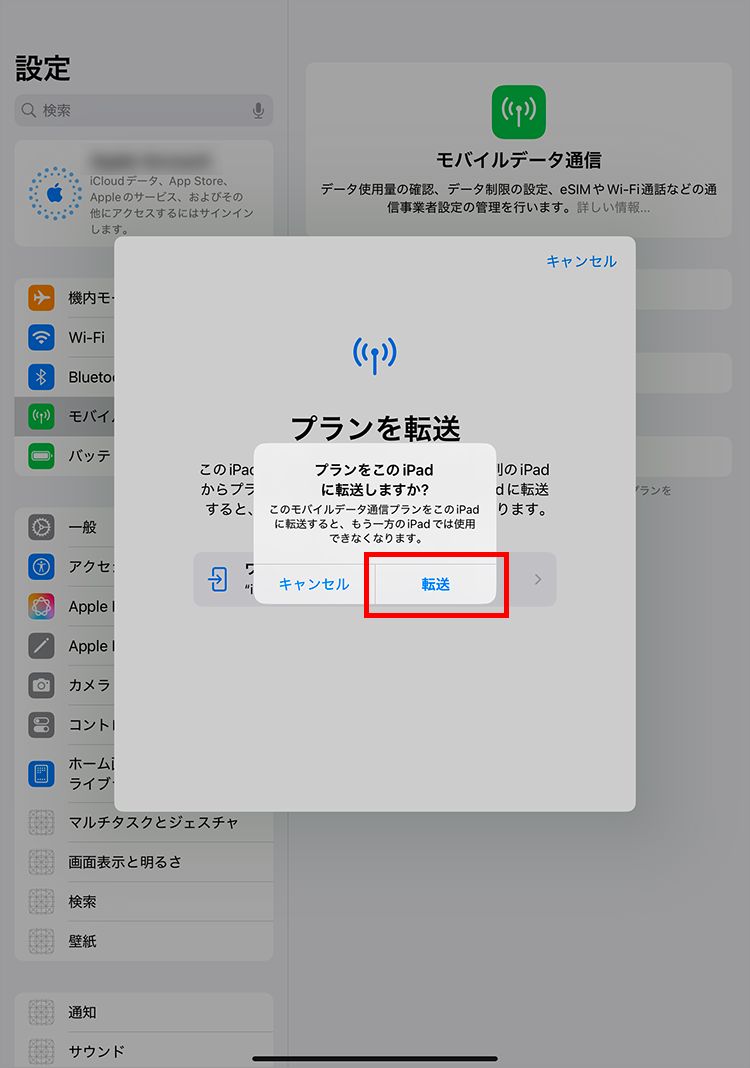
9. Tap "Transfer"
10. Enter the 4-digit PIN you set when signing the contract and tap "Continue"
11. Check the terms of use and tap "Agree"

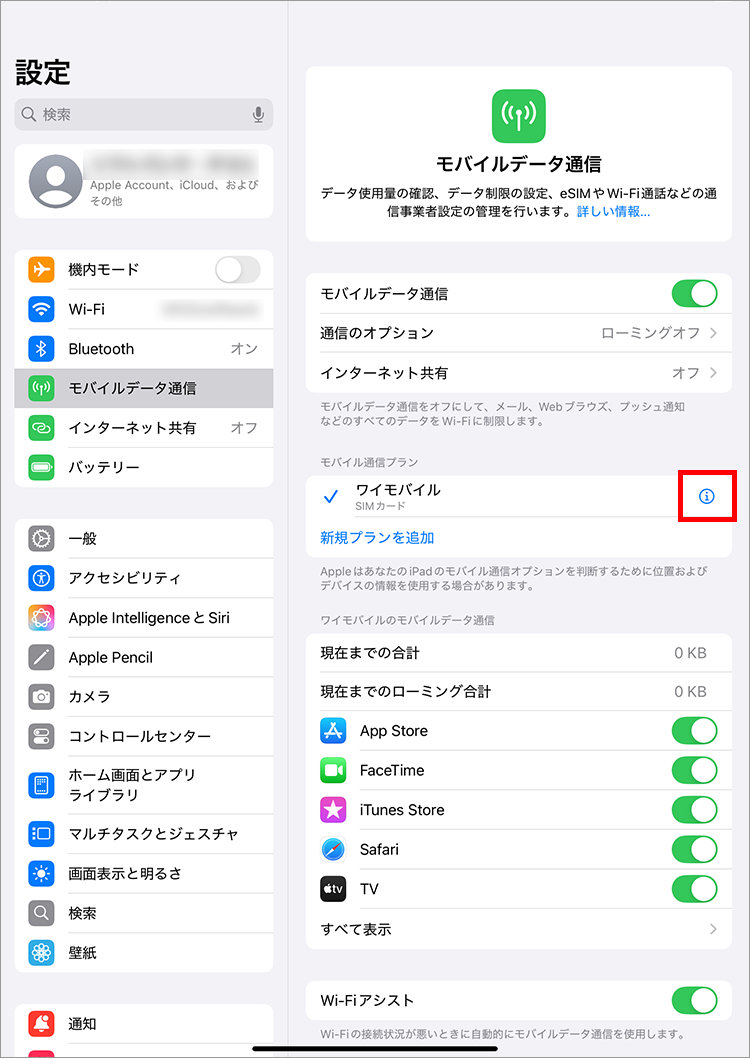
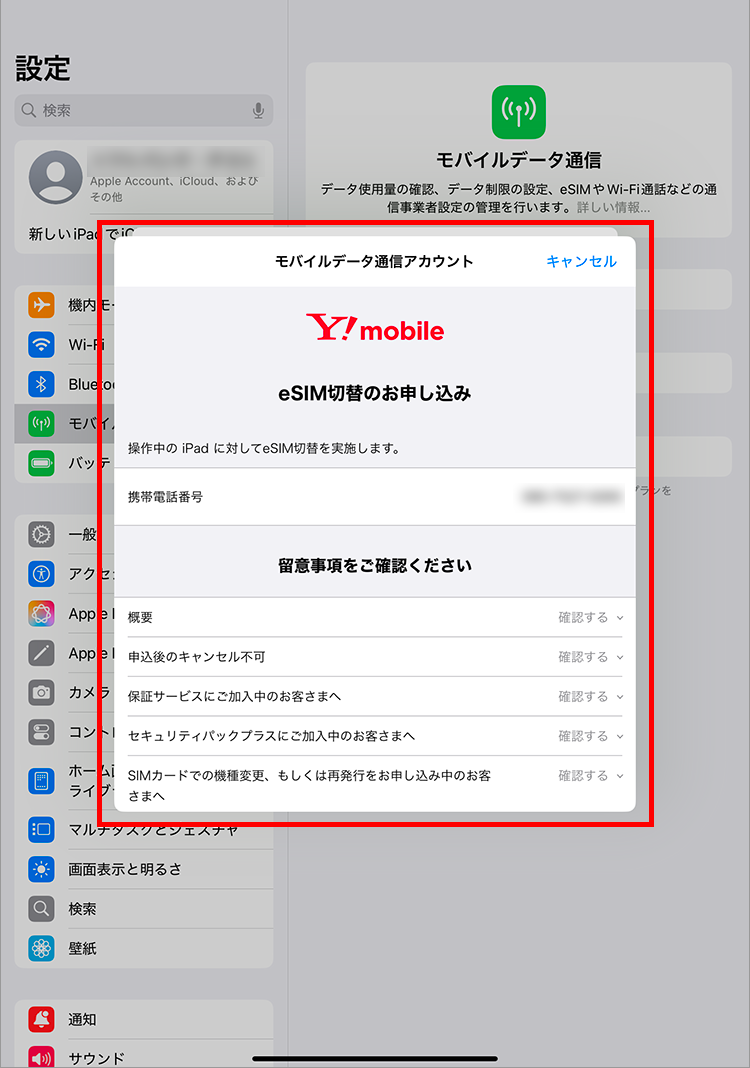
1. Tap the "i" mark of the SIM you want to change
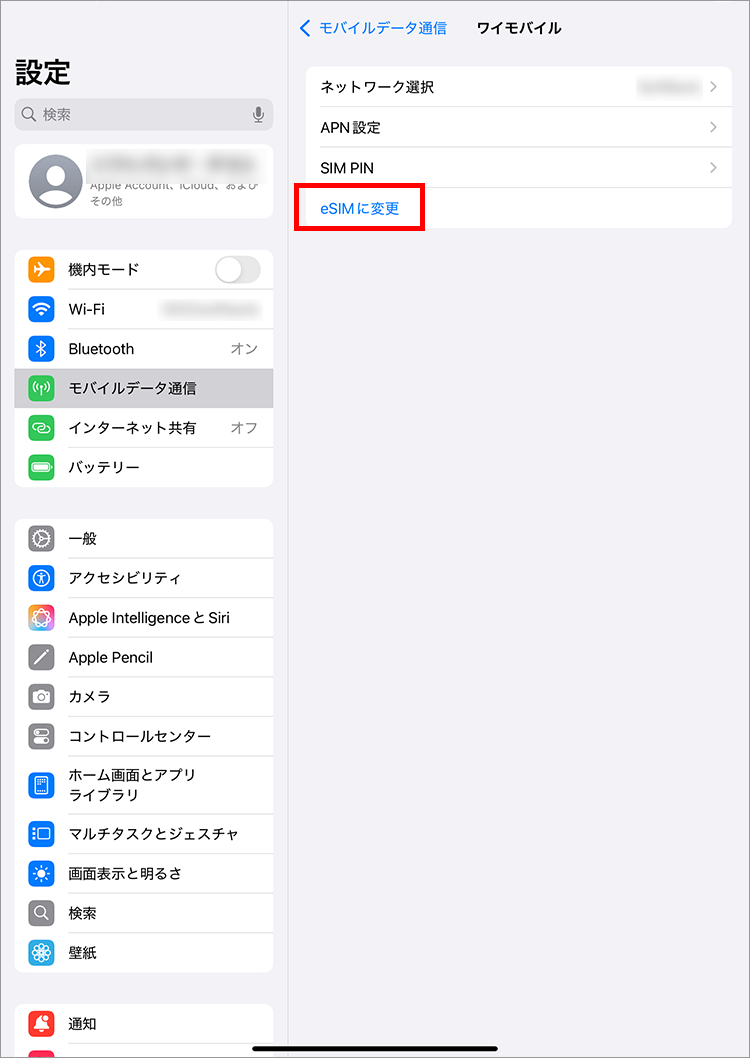
2. Tap "Change to eSIM"
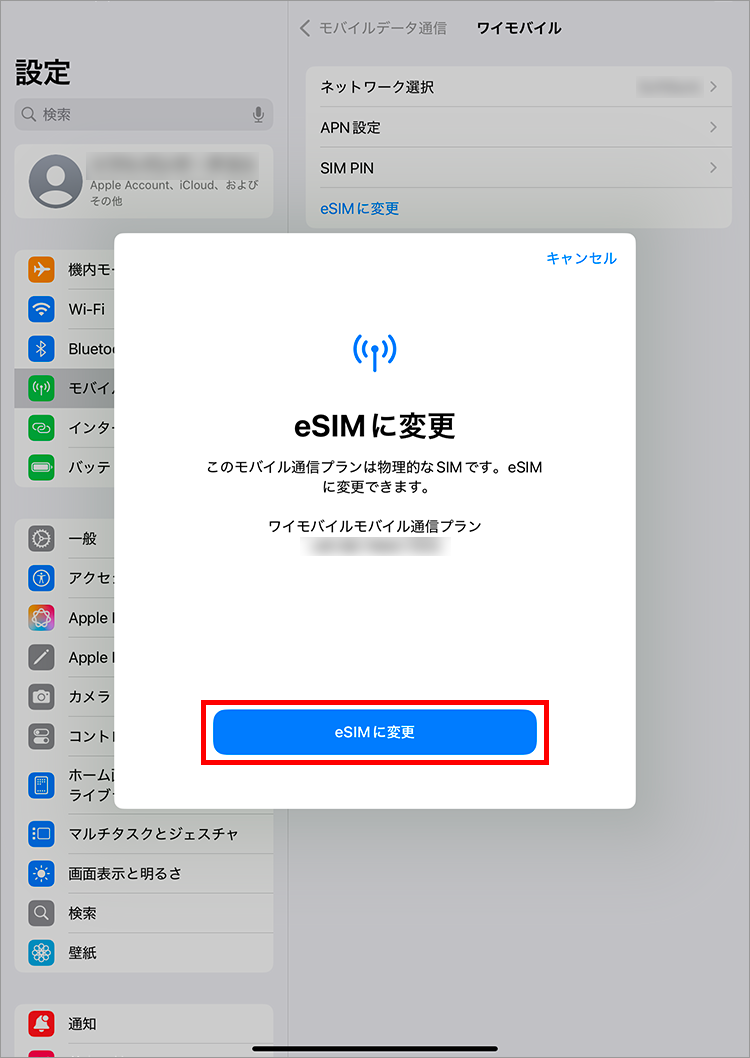
3. Tap "Change to eSIM"
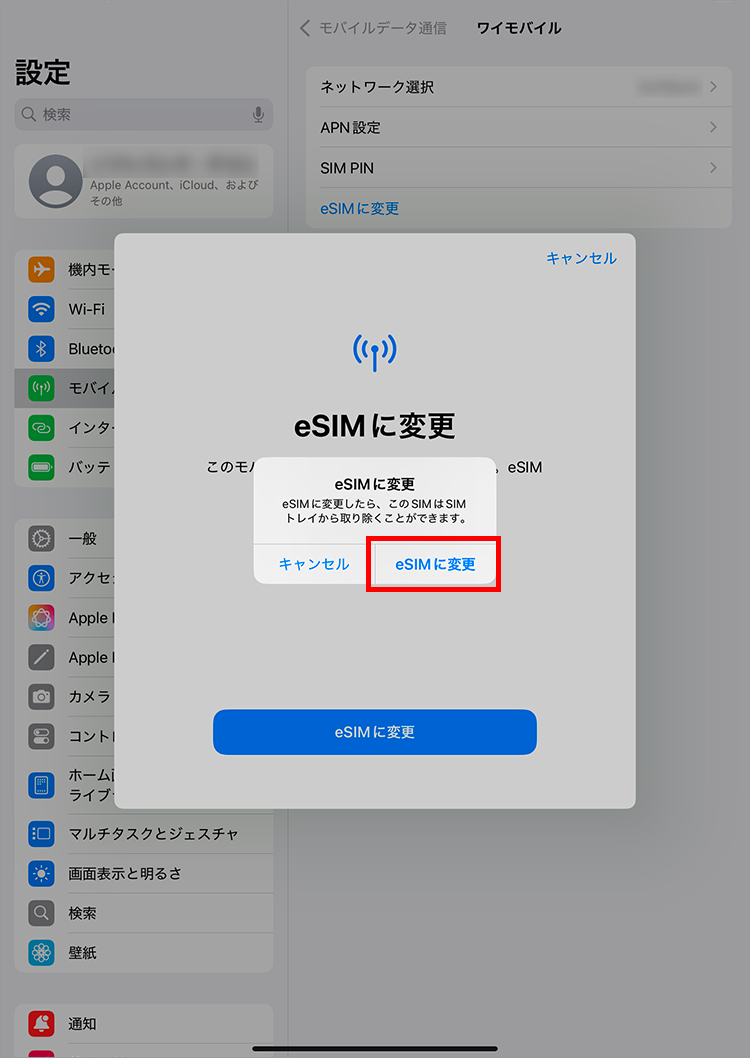
4. Tap "Change to eSIM"
5. Enter the 4-digit PIN you set when signing the contract and tap "Continue"
6. Check the contents and tap "Agree"
7. Tap "Done"
If the following screen appears, enter your mobile phone number and My Y!mobile password and tap "Log in."
After reading the terms and conditions, tap "Agree to all"